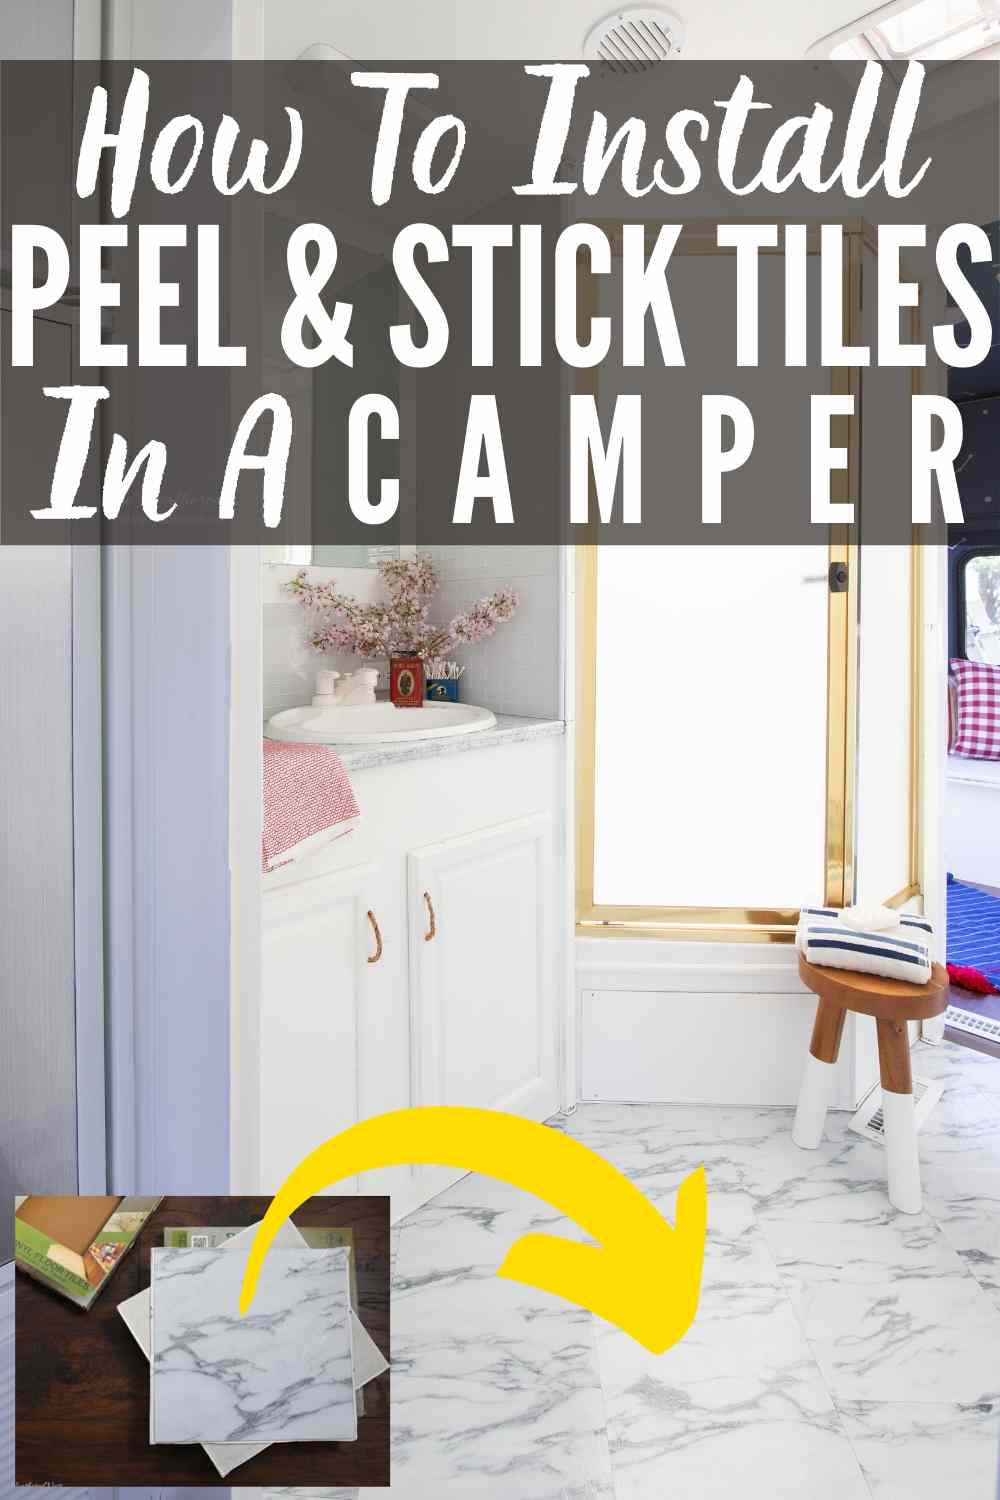
DIY Vinyl Floor Tile Installation in a Camper Remodel with a Modern Marble Look from Vinyl Flooring…
Thank you to Achim Flooring at Walmart for sponsoring this content! As always, whether sponsored or not, all opinions, bad puns, and cheesy jokes are mine all mine.
Do you have your own camper remodel happening right now? First of all, congratulations! That’s an exciting project to have embarked upon.
Second of all, I’m sorry. I now know how trying and difficult camper renovations can be at times. We’ve had more than one marital “discussion” about why we pursue these kinds of jobs. It can definitely be a stressful endeavor. But when you see it all come together, there’s no feeling like it.
The camper remodel project du jour here is flooring. Specifically, bathroom flooring.
Flooring options for campers need to check a couple of boxes. Specifically…
Camper flooring should be:
- Durable
- Waterproof or resistant
- Inexpensive
- Lightweight
- NOT wall-to-wall-carpet (ewww)

We were excited to try vinyl peel and stick floor tiles for this camper remodel because it checks off all of those boxes. And this marble-look 12×12 product from Achim Home Decor is what we chose to use.
Achim Home Decor makes a variety of other flooring styles, also available at Wal-Mart. These include Nexus Carpet Tiles, Portfolio Plank & Tile, and many more varieties of Vinyl Floor Tile.
Let’s run through the supplies you’ll need for your DIY vinyl tile installation now.

Supplies Needed For DIY Vinyl Floor Tile Installation in Your Camper
- Achim Nexus Tile Collection Self-Adhesive Vinyl Floor Tiles
- Basic cleaning supplies to prep your sub-floor
- Oscillating Multi-Tool with scraping attachment ( helpful if you need to remove old flooring remnants from subfloor)
- Prybar, hammer and needlenose pliers for removing old flooring
- Box cutter with plenty of fresh, new blades
- Pencil
- Tape Measure (metal or wood is recommended), speed square
- Contour gauge duplicator tools (not a need, but they are GREAT to have for this, and lots of other projects)


DIY Vinyl Floor Tile Installation Tips Video
DIY Vinyl Floor Tile Installation Process
1. Prep your camper subfloor.
In order to install your new vinyl tile, you’ll need to begin by removing whatever old flooring you may have in your own camper. Our travel trailer had two types of flooring: wall-to-wall carpet (gross) and linoleum.

Removing linoleum isn’t awful. You can simply cut it with a box cutter and pull it out. Just be sure to remove all the staples, as well. A hammer, prybar and needlenose pliers usually do the trick on that front.
The wall-to-wall carpet is a different story. I hope for your sake you don’t have to deal with any. Why? First of all, it’s just disgusting. No matter how clean people are, old carpet is just nasty. But in a camper? It can be particularly nasty.
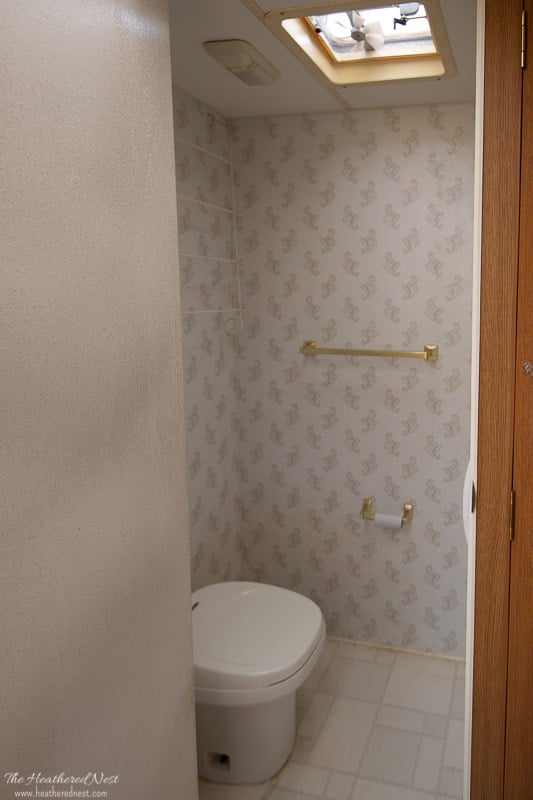
I wish I had a picture of the carpet in this beast before we took it out. Because I should have won some kind of “woman of the year” award for dealing with that stuff.
Beyond the nastiness factor, camper carpet is installed with one-gazillion staples. And that’s probably a gross under-estimate. It takes fairly close to an eternity to remove carpet from a camper.

Once you’ve removed your old flooring, you’ll want to inspect and repair any issues with the sub-floor.

Campers are notorious for having water issues, so don’t be incredibly surprised if you uncover any of that. Especially if you have felt soft spots anywhere on the floor in your camper.
Word to the wise…if you’re looking at buying a camper that has any soft spots, do yourself a favor and slowly back out of the camper, and run as fast as you can the opposite direction.

Trust me on this. We found out the hard way.
Dealing with subfloor issues is well beyond the scope of this post. But hopefully, that isn’t an issue for you anyhow. Assuming your subfloor is nice and sturdy, all that needs to be done is some basic cleaning and dusting before your vinyl floor installation.
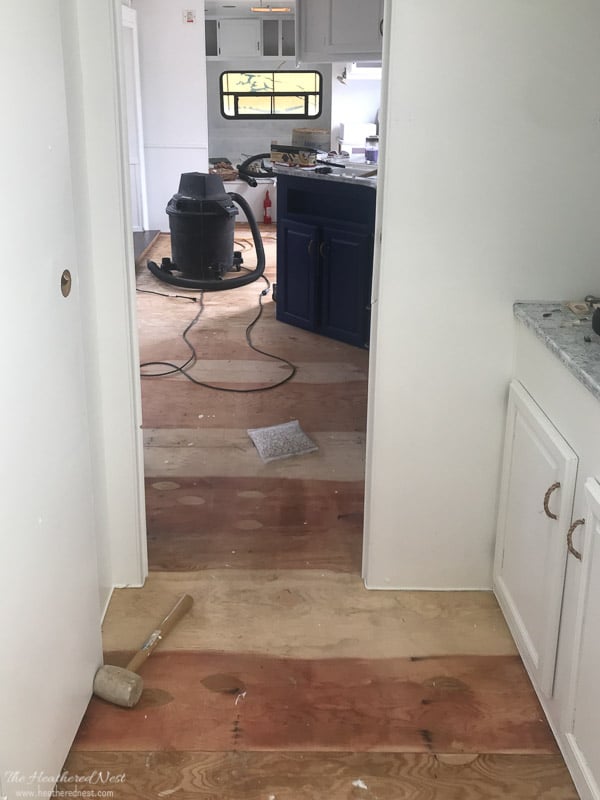
So what does that mean exactly? Here’s a short-list of to-do’s for your camper subfloor prep work:
Subflooring Prep Work for Vinyl Floor Tile Installation
- Remove all staples from prior flooring
- Remove any paper backing from the previous flooring and glue from subfloor to ensure it’s level and without any lumps or bumps (we found that a multi-tool with scraping blade worked GREAT for this job)
- Mop or use cleaner of choice and allow to dry completely
- Vacuum and/or dust
2. Determine your desired tiling pattern.
We chose to use the angle of the shower in our camper’s bathroom to determine the direction we would lay our tile.

Laying the tile in this direction was also helpful from the standpoint of avoiding a super long, straight line running the length of the already long, narrow camper.
If we would have made any little mistake as we were laying the tile, it would have been much easier for your eye to “catch” had we not laid it on a “bias” as we did.

Our pattern was an offset diamond pattern. We just offset each row by 1/2 the width of a tile. You could just do a straight diamond pattern so that each tile lines up completely with the adjacent tiles.
But again, there’s more chance of making a tiny mistake in that pattern that becomes really visible to your eye. So I’d definitely recommend offsetting each row by 1/3 or 1/2 to give yourself a little breathing room.
3. Peel and Stick Your Vinyl Floor Tile.
At this point, you’re ready to rock and roll. Here’s what I wish for you: a big, square room with no obstructions, angles or other wonkiness. If you have this type of situation, you will be done with this project in a FLASH.
If not, well, you’ll need a little more patience. Installation of these tiles is definitely not hard. But if you have intricate cuts to make to get around corners, etc. then cutting the tiles will take just a bit of time.
Now we’ll walk you through our best tips and advice for your installation, one by one.
Peel and Stick Vinyl Tile Installation Tips
1. On the back of each tile, there is a directional arrow.
The goal is to lay all of your floor tiles in the same orientation (arrow facing the same way for each tile). When you peel off the paper backing for your tile, DON’T FORGET which direction that arrow was facing (see image below)!

2.Have a new, sharp blade for your box cutter, and change it often.
This makes the cutting process much easier and will give you more precise cuts for the best look of the finished product.
3. You don’t need to cut all the way through the tile.
Instead, score it with your blade, then bend. Flip it over and cut through the paper backing.
4. A speed square was a lifesaver for the pattern we chose.
It was a huge help for making marks on a 45-degree angle. If you aren’t installing a pattern on an angle, then this is not as important.

5. Using a metal ruler for measuring is better and more accurate…
than your standard tape measure for this project. It can also double as a guide when you are cutting your tile (see our old school version laying on the floor in the image below).

6. Contour gauge duplicator tools are awesome…
to help give you a short cut for situations where you have odd angles or corners to cut. These inexpensive tools are a huge help and a great investment as they will save you tons of time and headaches.

7. Double-check and remove any dust, dirt, debris, lumps or bumps before you adhere your tile.
Lumps or bumps may show through the tile, and/or make it more difficult for the tile to properly adhere to the subfloor.
8. If any of the glue from the back of the tile gets on the front…
WD40 works GREAT to take it off quickly and easily.
9. Be patient!
Depending on the number of detailed cuts you’ll need to make, and the pattern you choose, installing this peel and stick flooring will take you some time, for sure. The pattern we chose, for instance, is very forgiving if its not 100% perfect, but it does take a bit longer to install.
Bottom line? Take your time and your flooring project will turn out great!
And that sums up the DIY vinyl floor tile installation process! Want to see some “AFTER” pictures of the camper bathroom? Here they are!!

Doesn’t the faux marble tile look great?

It’s such a clean, updated look!

And speaking of clean, that’s one of the biggest benefits of this type of flooring in a camper. It’s extremely easy to clean.
WAAY easier than the da#$ wall-to-wall carpet it took me twenty years to remove from this beast!

And very durable as well, which is another great benefit in a camper where people tend to play pretty hard!

So if you’re in the market for a modern look that’s affordable, durable and not difficult to install for your camper remodel or RV renovation, I’d recommend giving this Achim flooring product a try.

It’s carried at most Walmarts across the country. But if you can’t find it at your local store, it’s always available online as well.

That’s a wrap! I can’t wait to show you more of this camper remodel! It will hopefully be coming at you soon, so stay tuned. And in the meantime, don’t hesitate to comment here with a question, or you can always reach me via direct message on Instagram as well!
Pin this DIY vinyl floor tile installation post for later! And if you make one, leave a comment (or better yet, a photo) on the pin! That helps others know whether they want to try this project, too!

Pssst…before you go, I sure would love to hang out with you again really soon! Sign up now and get a no-cost copy of “Builder-Grade To Beautiful: 10 Totally Transformative Home Decorating Solutions, All Under $100!” Click here to enter your email or on the image below. Your copy will be emailed right away!


Leave a Reply