Welcome to the jungle.
Yes, that’s an 80’s hair band reference. And if you like 80’s and 90’s music, a special welcome to you. I know you and I will get along famously. Don’t worry. I know you hit your mouse in search of a “home tour” NOT Motley Crue “home sweet home” lyrics. Pinky swear we’re getting to that straight away.
It’s just that if you happen to be a product of the 1980s and 1990s this tour is gonna be extra special. “All that and a bag of chips” or…maybe even super “fly” as some of us used to say back in the day.

SO COME ON IN ALREADY!
This house tour starts in 1991. That’s the year our current home was built. It was also the year of Michael Jackson’s hit “Black and White”.
Frankly, though, I think he should have called it “Beige or Buff” because that color was EVERYWHERE in the early 90s. If you don’t remember that, this home tour is totally (said in the most Valley-girl of ways) gonna jog your memory.

We’ll bring you through the front door today since we’ve just met. But don’t expect to ever use this door again. We certainly never do. From now on, we’ll consider you a backdoor friend.

The exterior of our house was something that drew us to this home. It sits on top of a little hill and driving toward it we just thought, “Whoa”…this house looks so grand. A famous philosopher once said, “it ain’t fiction, just a natural fact…we come together cuz opposites attract.” I believe that was Dr. Paula Abdul.
Well, this traditional, pricey-looking house definitely attracted our quirky and penny-pinching family. We’re now heading into the 5th year with this pad. And for a couple that has gone through 5 homes in a 10-year span, 5 years seems like a small eternity to us.
Last thing I want to mention before we get this party started…
Everything that’s been done to this home we have done ourselves.
That’s right. Save one or two notable exceptions, which we will try to point out in this tour, we are ALL-DIY, ALL-the-time. “Why?” you may wisely ask. Because we ❤ spending extra-special-quality-one-on-one time together making our house a home ?. Queue the vomit emoticon, right?
Sure, we enjoy spending time together (mostly). But the REAL answer is that we are waaaaaay to cheap to pay anyone to do anything that we *think* we can tackle ourselves. YES, that delusion has put us in sticky situations (read post “Stupid Things DIY’ers Say”). But for the MOST part,
Sticking to this ALL-DIY rule has worked well for us. DIY’ing has allowed us to make amazing changes to our home that we would have never otherwise been able to afford.
And we hope that through this blog, we can pass along some of the things we’ve learned how to do so that you, too, can save money in your own home.

If you happen to feel 1/2 as psyched to have found us as we are to have found you, then let’s hang out more often! Join our “nest insiders”. Each week, we’ll have our free newsletter flown to your inbox, full of our latest DIY projects, crafts, and budget-friendly home decor ideas.
Right now if you join, we’ll send you a free copy of “Builder-Grade To Beautiful: 10 Totally Transformative Home Decorating Solutions, All Under $100” Click here or on that image above to grab your free copy 🙂

Changes we’ve made to the front exterior have been minimal. In fact, the ONLY project we’ve done is changing the exterior light fixtures. But it’s pretty rad how something as simple as changing lights can make a pretty big difference to a home. Yes, I did just say “rad”.


Here’s what you would have seen if you walked in our front door when we bought our house. Tell me that this space is not the epitome of 1990’s home decor sensibilities.
Beige picture frame moldings everywhere. Big ol brassy light fixture hanging out in the middle of the room. Nice bleach blonde-y oak hardwoods, and the lovely display of silk flowers on that oh-so-traditional sofa table.

So we changed things up.
Had the floors and railings/stairs stained (side note: this may be the ONLY thing in the home we did not DIY. I spent one hour working on those railings and completely threw in the towel.
That job right there is something that I wouldn’t wish on even that bully-girl in 5th grade who nicknamed me “bucktooth beaver”.

We had all the molding painted white and added our glass bubble light/jellyfish looking chandelier. We have more exciting plans for this space…someday…when we win the lottery.
Below is how the family room looked when we moved in. It’s an awesome space with lots of natural light. But there was no diggity no doubt this room needed some updating. I mean…that ceiling fan…gag me with a spoon, right?

The biggest change we made was an inexpensive DIY project. We added faux beams. Yep. FAUX. Those bad boys are as close to wood as SPAM is to real meat. But you’d never know it! We did a DIY tutorial on how to install those suckers, if you’re curious.
We also did a super simple DIY makeover on the fireplace brick and the firebox/wood stove. Just click the links for the 411 (you know you used that phrase back in the day…don’t lie).
Here’s a list of the DIY tutorials that relate to this space:

Here’s our dining room. Yep, more beige molding. Thanks to this home, I think I will forever have a gag reaction when someone discusses painting wood trim.
I spent hours, days and weeks painting the trim in this place. My traps were as jacked as Mr. T ala the A-Team after I got done with the trim in this crib.

We had a special surprise as we worked on this space. Termites. It was AWFUL.
If you’ve never seen termite damage, take a look at THIS POST. And I hope and pray you never encounter it in your own home.

After finding the termite damage, we had to basically re-build this room from the bones on out.

But after ridding the space of the termite damage, adding the molding, and some redecorating, we love how it has turned out. It’s a bright and cheery place.

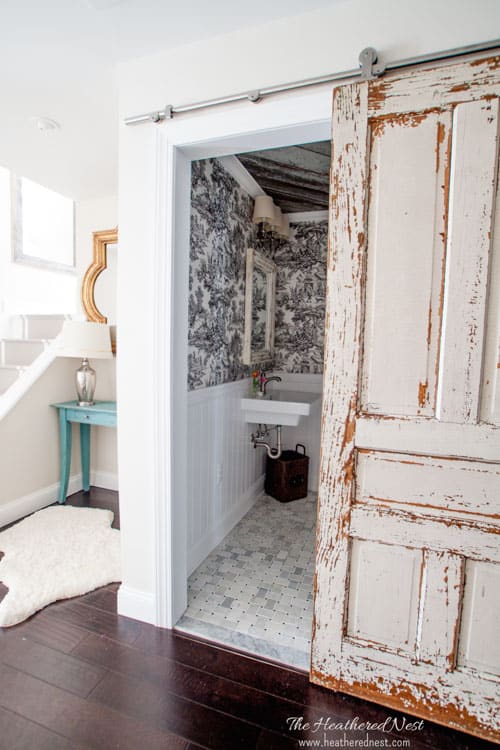
Welcome to what we affectionately called our “purple-people-eating-privy”.
As cousin Eddie would say “she a beaut, ain’t she Clark?” This little lady needed a make-under.

Another total DIY project, this bathroom was one of the first rooms tackled in the home. We added that transom window and pocket door.
Then the space got new tile, new lighting and a vintage 1930’s cast iron sink thanks to Craigslist.

Another amazing specimen of 1990’s design was our laundry room. Right down to the balloon-ish floral valence and the beige linoleum flooring. OH, and can’t forget that dreaded boob light flashing us from the ceiling.

While I would have loved to tell this whole space to Beat It..just beat it ?…
Are you singing right now?

We haven’t had the budget for a gut-job. So we’ve made a couple changes that we think have helped the space a lot.

Ah the deck. We called it’s BEFORE look “Alcatraz-chic”.

Since the deck is less than 2′ from the ground, we took a sledgehammer to the railings.
Post breakout, in a word this space now feels like “FREEEEDOM” ala Mel Gibson in what 90’s box office smash hit? Answer: “What is Braveheart, Alex?”

We built a pergola, cleaned and re-stained, and created some outdoor rugs with paint! We also made that outdoor chandelier that’s above our outdoor ping pong/dining table out of some vintage oyster cans.

And a DIY outdoor movie screen for a whopping $10.

As Ace Ventura would say, “Alrighty then” it’s time to show you around upstairs. And we’ll start with a BEFORE shot of our large, but very beige master bedroom.

And below is the bedroom today! This renovation is one of our most recent DIY projects. Most of the changes were easy cosmetic things like paint.
You can see we added a ceiling medallion (that circular piece of molding above the chandelier). That is a SUPER easy and inexpensive DIY to try. If you’re interested, we have a tutorial HERE.

We also built a faux fireplace that holds an ELECTRIC fireplace (YES, they exist, and although I’d prefer a gas fireplace, we don’t have gas in the home…so that wasn’t an affordable option.
PLUS, we can change the color of our “flames” to anything from green to rainbow…so we’ve got that going for us 😉

The post on how we finished the brick on our master bedroom fireplace is one of our most popular posts to date. The technique is VERY inexpensive. It’s called a “german smear”.
Two other areas in our master suite to show you. First up, our closet.
This used to be this tucked away room above the garage which was completely inaccessible from anywhere but straight through our bedroom.

For years, it was just where we threw junk we didn’t have another spot for. But now, that’s where our walk-in closet resides:

We got all those wardrobes secondhand (they’re Ikea Pax units) from Craigslist…saved us thousands. Sources ⤵️ for other items in the space.
Our most recent renovation was the master bathroom. And it took us FOREVER to finish because we did 100% of the work ourselves from plumbing to painting. SOOO glad it’s done!

And here’s how it looks now! We’re so happy with how it turned out 😊…

I suck at many parenting-type things. Namely:
- Participating in PTA activities.
- Playing trains. Sorry. That just isn’t much fun. And don’t tell anyone else, but I gotta say that Thomas the Train song is AWFUL.
- “For real” camping, as my kids call it. I’m a happy “fake camper” though. Meaning? My tent must have a real roof, indoor plumbing and a fridge. Additionally, I require a bed that does not zip up, and it must sit at least 8″ off the ground. Hey, we all have our things.
While I aspire to be like you parenting pals who have the patience to put snowsuits on kids without wanting to scream four letter words, or pack lunches with “fun food” shaped like butterflies and such…I will likely never be that great of a parent.
But one thing I CAN do is create fun rooms for our kiddos. Design is my love language. And for that reason, our kids’ rooms are my favorite places in our home.
First up is our daughter’s room. It took me forever to settle into a design for her. I think it was because I loved her room in our previous house.
I’ll show it to you guys here just because it’s still one of my favorite rooms we’ve ever renovated. Here it was BEFORE:

And here’s the AFTER:

Now, here is her space in our new home. BEFORE, it was a very boxy, nondescript spot. Nothing awful. It was just kinda bland.

And here’s the AFTER 🙂

Some of the fun DIY projects we took on in this space were adding that ceiling feature, creating that niche area for her bed and a desk area that is out of sight in the above shot.
The desk is awesome. It’s my fave piece in her room. It’s a Craigslist find that we re-vamped and I’m ga-ga over it now. None of these projects were difficult! So if you’d like to try your hand at any, here are some tutorials from this space if you’re interested:
Our youngest son’s room BEFORE looked almost identical to our daughter’s room before pictured above. Just kinda ho-hum. A blank canvas.
He’s an outdoorsy kinda kid, so we wanted to give him a lodge-y kind of room.

And a place where he could “camp” whenever the mood struck without Mommy feeling as guilty about not wanting to participate in his boyish escapades.

fisherman sconces | stump stools | felt campfire & s’mores | faux antler chandelier
We have some really fun DIY projects in this room that you may want to try. For more details, the links are below!
Lastly here is our eldest’s space. This kid has ALWAYS loved trains.
And when we moved into this home, and the room looked as it did below, he was having no part of it. This became the first of the kids’ rooms to be completed.

And AFTER:

custom wall mural (used this etsy shop) | hudson blanket | fisherman lamp
The bathrooms in this house were SUCH shining examples of late 1980’s, early 1990’s style. And although I have such a massive soft spot in my heart for that era, I also wasn’t sad to let go of things like 4×4 porcelain tile and cheesy Hollywood strip lights when the time came to say goodbye.
This house was holding onto the past like a former homecoming king’s futile attempts to climb back to that peak after his high school days have passed him by.

Having NOT been a high school homecoming queen…or even a distant runner-up, the chance to ditch this space felt like a bit of payback for those awkward years of weirdness and un-popularness and such.
I couldn’t WAIT to go Peter Gabriel style circa 1986 and SLEDGEHAMMER this room. It was cathartic. And what felt especially good is that we finished this space for about $1850 ALL IN. Say whatttt?

tile | vintage license plates | fluted glass pendant light | tilt mirror
If you’ve ever gutted a bathroom, or paid someone to gut your bathroom, then you know $1850 is a pretty impressively small budget. To see some of the more popular parts of this DIY renovation, head to the links below.
And now, I’m going to take you into what we affectionately call our Golden Earring-wing. I know…such a ring to it, right? WHY Golden Earring? Because we’re headin’ into the…
Twilight Zone…

At least it was the twilight zone. This was the darkest, most 80’s-ugly space I had ever seen.
But you be the judge. The stairs to our basement alone made me never ever want to want to explore what was beyond them. But for the cost of a couple cans of paint, and some upcycled odds and ends, here it is now…

This literally cost next to nothing. Just a 5-minute boob (light) job, and some paint on the stairs and walls.
We took an old bathroom vanity mirror, cut it, and framed it out with some scrap barn wood that was used in one of the rooms you’ll see in a hot minute.

We painted these stairs several years ago, and they have held up SO well.
I even wrote an update post so you could see how they’ve held up after 5 years. I thought we’d probably have to repaint in a few years, but they are still in amazing shape.

Here are some links to some helpful DIY tutorials done in this area of the house:
Alright, here come some more SICK before shots guys…
BOO-YAH!
I mean, I think I win, right? This has GOT to be one of the WORST basements you’ve ever seen.

And it was one hell-uva DIY project. But we did it. Everything was full-out DIY except finishing the drywall. We hung it ourselves, then paid someone to spackle and sand.
Why? The long and short of it was the time commitment. But we talk more about it in THIS POST.

And above is the AFTER of the hallway. Was took down part of the wall in the stairwell to open it up. Stole square footage from a previously unnecessarily large bathroom and widened the hallway to make it feel less closed in.
Then we added tons of storage, new flooring, lots of lighting and light and bright paint. And here is the family room/rec room space BEFORE:

And AFTER.

We wanted this to be primarily a space for the kids. But we also wanted it to be a comfortable place for the whole family to kick it. I could talk your ear off about this space, but I won’t 😉
If you want to know more, here are links to the basement renovation series:

We’re saving the guest quarters for last. I know this tour’s taken so long that you’re probably ready to crash.
I know my fingers are tired of typing at this point. So this is your bathroom. The guest bath. But we didn’t think that guests would stick around too long if we sent them in here, so we made some modifications, if you will.

Meaning, we demo’d the hell out of this space and started over from the ground up.
Here’s the space now. We like to call it “Napoleon’s throne room”. Because it’s a little space, but it’s got a big, powerful personality.
The link for more info on this space is below:

And last but not least, since we’re both now completely exhausted…here’s your room.
BEFORE, there was ZERO natural light in here. NO WINDOWS. It was pretty awful.

But, nothing is ever hopeless, right?
Before I started blogging, I was a physical therapist. And I had the privilege of working with a lot of people. Lots of people who had gotten a raw deal. People who felt broken, hopeless or maybe just a bit “outdated”.
And no matter how dire or difficult an issue a patient was facing, I tried to be there to help them get better. And you know what? It seemed nearly a universal truth that the ones who were willing to work hard and put energy into their rehabilitation were the ones who had the best outcomes.

The same is true with our homes. I think that any of us are able to make a house a home if we have the energy and desire to do it. Budgets can be big, or budgets can be small, but if we have a vision, we can work toward it.
I’m so glad you found us here in our little corner of the web. It’s a big, and sometimes scary place out there. We want this to be a place where we can help you make your house a home.
And feel confident that YES, you can pick up a hammer. Yes, you can paint that wall! YOU can sew that curtain.
If you are willing, we’ll help make you able.
(And we may try to entertain you with some sweet 80’s hair metal and old school rap lyrics here and there if you’ll allow us).
In parting, we’ll leave you with those immortal words of the great Annie Lennox (as in Eurythmics circa 1983), who said…
“sweet dreams”
(I’d add in the “are made of this” part, but that would be cruel to get that song in your head…it’s so darn catchy, right?)
Pssst…before you go, I sure would love to hang out with you again really soon! Sign up now and get a FREE copy of “Builder-Grade To Beautiful: 10 Totally Transformative Home Decorating Solutions, All Under $100!” Click here to enter your email or on the image below. Your copy will be sent right away!


