


We did a DIY staircase remodel by painting our stairs. Learn how to paint stairs with this tutorial and find out how our staircase renovation has held up over the last 5 8 years…
Today, we’re talking about how to paint stairs. A stare-worthy painted staircase remodel, to be exact.
Truth is, I guess these stairs have always been fairly “stare-worthy”. But in the beginning, I don’t think it was really for good reasons. But I’ll let you be the judge.

*This post was most recently updated 1/2022*
If painting your stairs is something you’re seriously considering, then grab the free printable stair painting guide!
Click here or below. I’ll send your free printable stair painting project guide immediately⤵

Before we get into the how-to, here’s what you’ll need for this stairs project →

Supplies for a Painted Staircase Remodel:
- porch paint for base color (Behr porch & patio – ultra-pure white)
- porch paint for runner color (Behr porch & patio – baltic gray)
- Frog tape (1.5″ for delicate surfaces)
- angled 2.5″ paintbrush (this is my favorite brand/size)
- paint roller, pan, and nap
- measuring tape
- palm sander(this is the one we own)
- wood putty (paintable) or Bondo (to fill large gashes or dents)
Choosing Between Staircase Renovation Ideas
If these stairs look familiar, that’s because I’ve shown you these basement stairs of ours before. Truth is, we’ve had to renovate stairs MANY times in our day, and the problem is, staircase remodels are almost always $$$.
Well, we didn’t have $$$ for this project. We had more like ¢¢¢. Problematic.

Our first plan was to stain the stairs.

However, after a ton of sanding work, we realized this plan was going nowhere. These treads are made of pine. Pine is soft, and the treads have tons of wear on them. Gashes, divots, etc.
The sad reality is that stain doesn’t take evenly to pine in this condition. If we were willing to put a ton more time into the staining plan, it MIGHT have worked, but we weren’t willing to spend that time and energy on a ‘maybe’. So, we abandoned ship on Plan A.
We priced out a Plan B of purchasing new oak treads to stain. Holy moly. We realized quickly that wasn’t in our ambitious (cheap) budget.
So, we moved on to Plan C. It took a while for the hubs to embrace Plan C, since, admittedly, it was a little “different.” Sure, we’re not the only ones in the world to have painted stairs, but they are not universally loved and accepted on a regular basis…yet.
I love the look. Since it was certainly the right price point, he agreed to give it a try.
Don’t forget! You can make this project easier by downloading the free guide!
Click here or on the image below. I’ll send your free stair painting printable guide immediately ⤵️
How to Paint Stairs: An Affordable Staircase Remodel Option
With Plan C as the chosen route, we got right to work on our staircase renovation.
Step #1: Preparation
The preparation for painting wooden stairs is much less than it would have been for staining the stairs (bonus!).
First, take off any old paint or coating to ensure the new paint sticks well to the stairs. We used a palm sander to remove the glossy coating that was on our stairs.
If you have any HUGE gashes/divots/etc, you might want to try to sand those out or fill them with wood putty or Bondo to smooth them out a bit.
Once the sanding portion of this staircase remodel project is complete, simply make sure the staircase is wiped down and clean to remove any leftover dust.
Step #2: Prep Your Landing (if Necessary)
In our case, the landing was a subfloor that had been covered in linoleum. We decided to cover the landing with utility oak hardwood flooring.
This stuff is outstanding, and the best part is that we purchased it from Lumber Liquidators for .99/sq ft!!
We were able to use the old nosing piece to finish the edge of the landing, but we had to raise it up 3/4″ with plywood to match the height of the new oak flooring. Once the oak flooring was installed, we used the palm sander to sand the floor until it was nice and smooooooth.
Here’s what it looks like installed…

And if you’re wondering, YES, we do put our children to work on all our crazy DIY projects. And YES, pajamas are the standard business attire around here.
Step #3: Paint Your Base Coat(s)
We painted two base coats of the Behr ultra white porch & patio paint on the stairs (risers and treads) using a combination of a roller and brush.
This part of painting basement stairs isn’t really any different in terms of supplies or technique than other paint jobs you’d take on.

Step #4: Tape Off Your Runner Starting With the Outside Edge
This is the ONLY somewhat challenging part of this staircase remodel project. Take your time as you tape so that the results are great.

Otherwise…you’ll either have to live with the paint job being flawed OR redo the entire project. Neither one of those options appeals to me; trust me, it’s totally worth it to take your time on the taping.
Decide on the thickness of the gray “stripe”. We settled on 1.5″ because it was the width of the painter’s tape. 😉 That decision, alone, made taping the steps much easier.
Then decide on how wide you want your gray runner to be. In the image above, the blue painter’s tape was placed where our gray stripe would eventually be painted.
TAPE THIS PART FIRST.
Once I figured out where the stripes were going to go, I measured from the edge of the stair to the blue tape. Then I cut a spacer out of wood and used that to help align the blue tape as I went down the stairs.
**Note: we are using the regular blue painter’s tape for this portion because it’s cheaper and only being used as a placeholder. We personally prefer the Frog Tape to actually “do the job” here. The blue painter’s tape will be removed before you start to paint.**
Make sure to grab your printable DIY guide for this project! It’s free. Click here or below on the image to get started!
Tape off the Rest of Your Runner
Once the blue tape was installed and we were happy that it was nice and straight, we took the yellow tape (the Frog Tape) and ran it next to each side of the blue tape.
Repeat this for the other side of each stair.
Once you have your two lines of Frog Tape in place, remove the blue tape so that you’ll be able to paint on your gray stripe in that location. Remember: under that “inside” yellow tape is where your white “stripe” will be once the tape is removed.
Now repeat this process on the opposite side of the steps. Below is how the stairs should look prior to painting the gray runner.

Step #5: Important Step BEFORE You Paint Your Runner
Go back and do a light coat of base color (in our case white) over top of the tape, everywhere. This seals the tape edges so that you won’t end up with any paint seeping under your tape job!
This step is the most important tip for ensuring you will have clean lines created on your painted stairs!!! Just make sure it is a very light coat of paint that you put on.
Step #6: Paint Your Runner in Batches
You’ll be tempted to start at the top of your stairs, or at the bottom and just paint EVERYTHING now that you have everything taped off.
DON’T DO IT.
If you do that, you likely won’t be able to get to the other end of your staircase once you’ve painted! Yikes!
Instead, paint your runner in sections so that you’ll be able to get to the top or bottom of your stairs by skipping a step here and there. Once the first application of your runner paint has dried, go back to those steps you skipped, and give them the first coat.

You can see in the image below that we didn’t hold back with the gray paint. You really want to go all the way to the tape, and then paint OVER the tape as well so that you won’t have any unpainted little spots.
As a reminder, (you can see how we did it), leave painting the landing for last so that you can still negotiate the stairs even in the middle of your project.
Step #7: Tape and Paint Landing (if Applicable)
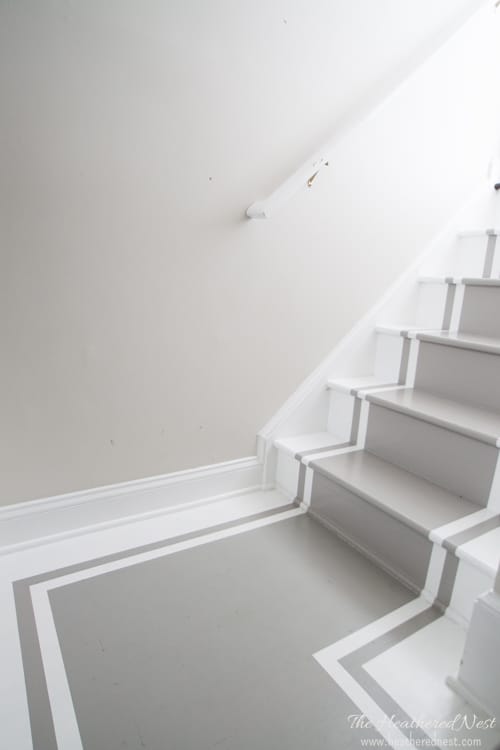
Taping the landing was a little more challenging. I first taped the stairs above and below the landing. The reason I did it that way is so that when I went to tape the landing, I could match up the runner from the stairs above the landing and the stairs below the landing.
I used a straight edge to get the tape as straight as I could, but in the end, I had to eyeball it a little bit to get the runner on the landing to match up with the runner on the stairs.

NOTE: Where the tape turns 90 degrees, you will have 2 layers of tape. In order to fix this, put a sharp blade or a box cutter and cut a 45-degree line through the tape. Remove the excess tape so that now you have a single layer of the tape forming your 90-degree turn.
The important parts in this step are to:
- use a new, sharp blade
- only cut through the tape (so you don’t cut into your landing)
Don’t forget to grab the printable guide! It’s free! Click here or below to grab your copy now⤵️
Step #8: Remove Tape

All that’s left to do is remove that tape!!

Step #9: Enjoy Your New Stare-Worthy Staircase Remodel

And that, in a nutshell, is how to paint stairs!
We love how these painted stairs turned out. For the cost of 2 gallons of paint, we have renovated an old staircase into something new-looking.

A couple more uber budget-savvy DIY projects finished off this space:
First, our DIY mirror frame we made using a builder-grade vanity mirror and some leftover barnboard from our guest room and bathroom ceiling projects.

And we took that builder-grade flush-mount “boob” light and created a beauty out of it in about 5 minutes. No joke!!

As I update this post, the painted stairs are going on being done for 8+ years! If you want to see some updates about how they’ve held up, here are a couple of links:
Staircase Remodel Updates:
See the stair after 2+ years
See the stairs after 5+ years

This super inexpensive project has even been in print! Check ‘er out in This Old House magazine. Not bad for a couple of cans of paint and a little DIY time and energy!
Pin this post for later! And if you try this project, leave a picture of your finished staircase remodel on the pin! That will help others decide whether they want to tackle this painted stairs project, too!

Pssst…before you go, I sure would love to hang out with you again really soon! Sign up now and get a no-cost copy of “Builder-Grade To Beautiful: 10 Totally Transformative Home Decorating Solutions, All Under $100!” Click here to enter your email or on the image below. Your copy will be emailed right away!




Marysa says
What a neat idea! We are in the middle of a staircase redo, and I love the idea of painting a runner on the stairs. Your project came out beautifully!
Carol says
How long does it take to get your guide? Sorry impatient up early and want to get an early start!
Heather says
Hi Carol, it’s emailed immediately after you sign up! If you don’t see it, check your junk and spam folders 🙂 Happy painting!
Nicola says
Did you use low lustre or gloss for the white paint?
Heather says
We used gloss
Eric says
The tip to paint the edges of the yellow tape with your base colour is the highlight. I have always been frustrated with my lines, but that eliminates that problem completely.
Mallory says
I love this! Did you need to polyurethane over top to preserve the steps?
Heather says
Nope. Definitely no poly. It will yellow the stairs. This type of paint is made for this type of application, so no need for polyurethane.
Stephanie Smith says
Don’t you need to seal the stairs? Looks great!
Heather says
Nope. Nothing beyond the correct paint used as described in the post 🙂
Monica says
Did you have to sand the stairs down completely before painting? We also have pine treads and they are stained but I want to paint the risers and the treads white. I didn’t know if I have to sand the treads down to the bare wood or not. Help?!
Your project came out great!!
Heather says
Hi Monica! You shouldn’t have to sand them down completely as long as you’re using the right primer 🙂
Clare says
Hi, you can buy anti slip paint and there are also transparent strips on Ebay to also prevent slipping. Hope that helps.
Heather your stairs are absolutely beautiful
Heather says
Those are great ideas 🙂 Thanks for chiming in, Clare!!
Midori says
Hi! So how do you keep all the kiddos from slipping on the stairs? We have had uncarpeted stairs in the past and have had some really bad accidents…any thoughts? Thank you, love your site so much!
Heather says
Hi Midori! Wish I had a great idea for you in that regard, but the reality is you’re right! A carpeted stair (for the most part) is usually less slippery than painted or hardwood stairs. I think that the look of a runner over top of a painted staircase is beautiful! So if that is an option that makes you feel safer at home, then go that route! It’s important to feel safe and comfortable in your space. And thanks so much for the nice compliment. I appreciate you being here very much 🙂 Heather
Kelly says
Hi! Your stairs look great! I’m about to begin a project similar to this. I noticed that you painted your railing. Did you sand it first and did you use the same white paint that was on your stairs? Thank you!
Heather says
Hi Kelly! Yep. Same as the stairs 🙂 Good luck w/ your project! Would love to see how it turns out!
Jenn says
Did you put a seal or anything over it to make it last? I have 4 kids and would hate for it to only last a year or 2! Thanks!
Heather says
Hey Jenn, we did NOT put anything on top. This paint is made for this type of application, so no top coat needed. You certainly CAN put one, but poly will yellow your finish, so keep that in mind. Have you read the post I wrote 2 years after this project was done? That will give you a sense of longevity: https://heatherednest.com/painted-stairs-2-years-later/ – Also, I am publishing ANOTHER update post on the stairs this summer after it’s been done for over 5 years, so stay tuned for that. Spoiler alert: they still look great.
JoAnne says
Heather, how long did you take to do this? Did you leave it dry over night before putting on the gray paint? Can it be done in a day or a weekend?!! I have a stairwell that needs brightening up and this would be an awesome fix! Thanks for sharing it. It really turned out beautiful!
Heather says
Hi JoAnne! We did it in a weekend! Check your paint…it will tell you how long to wait before applying another coat. Just be sure to follow the instructions b/c you don’t want to tape over wet paint! You’ll be sad when it pulls off your fresh paint. And definitely, use the Frog Tape. It really does help.
Leah says
Hi! Lovely job! Have you had any issue with paint flaking or chipping with use? I’m concerned my kids and dogs will ruin the finish.
Heather says
Hi Leah, I wrote an update post that discusses how the stairs have held up over the past few years. You can check that out here: https://heatherednest.com/painted-stairs-2-years-later/ – we don’t have dogs, so I can’t give you any info about our experience there, but they’ve survived kids beautifully thus far.
Karolyn says
This is just so fresh looking…I love the results! Great job and thanks for sharing!!
Heather says
So glad you like it!! And thanks for reading!!
Jody says
When I get into my new house (old house)
the stairs are not in your face but I am going to do what you did to them. I liked the pictures I saw that painted like this but my right brain could not comprehend. You wrote it out and I said oh. Ok. I can do this.
Heather says
Oh good!!! I hope you do try it, Jody!
Julie says
Beeeeuitful! Love the transformation!! Awesome job!!
Heather says
Yeah! So glad you like it, Julie! Thanks for your comment 🙂
Uncommon Sensesc says
This is what I’m going to try on our already-painted stairs! I painted them when we moved in about 18 years ago, made the mistake of putting an oil-based polyurethane on them and it turned the white risers yellowish. I’ve lived with them this long and I’m sick of them. Your design and the colors are just classy and gorgeous – I am going to look at the paint colors for a bluish gray but I’m sticking with Behr (I have always loved Behr and have used it on all the trim in the house and a lot of the walls). Thank you for a great design!
Heather says
Yeah! So glad to hear you’re going to give the project another whirl! Will you send a pic when you’re done? Or post it on the pin on Pinterest? That really helps others see that they can accomplish it, too!! Good luck!!
Heather Lloyd says
Loved it before; still love it! It seems like the key is using the right kind of paint. I used regular wall paint on my stairs 2 years ago and they’re pretty chippy. Luckily I didn’t go to all the work to put on stripes like you did! I’m going to redo it like you’ve taught.
Danielle says
Hi they look great! No primer before or poly after?
Heather says
Nope! We used a porch and patio paint with primer, so no need for that step. And the poly yellows the finish, so we didn’t want that to happen. Haven’t needed it, either. Finish has stayed looking great going on 4 years now 🙂
Kathryn says
I’m obsessed with these stairs and am going to do the same thing for my basement steps.
I wanted to know how long the process took though. If I wanted to get the first step done with just painting the stairs white, how long would it take before you could walk on it? I have a dog and her main exit to the back yard is through the basement, so I’m trying to work out the timing of the project.
Thank you!
Heather says
hmmmm…it’s been years since we did this, so I don’t recall. I think we definitely stayed off of them for at least a few hours. Honestly, I would defer to whatever the dry time on the back of the paint you’re using says. Usually those are really conservative estimates, so if you go with that time frame, you should be safe!
laura says
Hi!! i am painting my stairs this weekend and there seems like so many different ways to go about it. im officially following in your footsteps. might just add some poly at the end because we do wear shoes in the house sometimes. also, i am doing plain black so i dont have to worry about yellowing. im doing the backs just white beadboard. im going to home depot today to get the Behr porch and patio paint but i see there are 2 different ones- low-lustre and gloss enamel. i know low lustre will be good to make it not too slippery but the gloss will be good for the look. which one do i go with?!? lol thanks so much for all your tips!
Heather says
Hi Laura! Exciting!! You’ll love it. Just do me a favor and try the poly in one teeny tiny spot first, let it dry, and THEN decide. Poly really makes things yellow 🙁 …we didn’t use it, and I think we are now three years in, and the stairs still look GREAT. Pinky swear. I don’t think you need it. As for the lustre, ours is the gloss enamel. Would love to see how yours turns out!
laura says
ok!!! great! thank you!!! i will send pics! just started following you on fb! 🙂
Kimmy says
Alas! I have finally found the perfect project and look for my ugly carpeted stairs! Thank you so much for this idea from another idea! ^_^v Awesome! Your before and after simply looks gorgeous!
Heather says
They look amazing! Great job! 🙂 Did you paint the wood trim on the wall the same white color as the stairs? I’m replacing and painting my stairs white as we speak but trying to decide what to do with the trim! 🙂
Heather says
We did not. We used Behr white semi-gloss for the trim, which is the same paint we have throughout the home for the trim. Same brand of paint though, so the white look identical except for the sheen.
Susan Gray says
My stairs and floor were already painted a vile red colour which is chipping and horrible looking. My question is, do I have to remove ALL the old paint before starting this job because if so, it’s going to take forever. Thanks
Heather says
Hi Susan! I can’t tell you for SURE, but as long as the red paint isn’t chipping or flaking, it should be ok to not remove it all. You may have to do more than one coat of the base color, but that’s all I’d suspect you’d need to do “extra”.
Teesha says
Hi
Awesome job…..is it slippery by chance? I was just wondering like with socks on etc….thank you
Heather says
Hey Teesha! I’d say it’s as slippery as hard wood floors on steps are 🙂
Kris says
Loving this stairway- I am totally inspired to be a weekend warrior…(or week?) for this project…can you tell me what gray you used on the stairs? I have such a hard time choosing the right gray color! Thanks!
Brent E says
Excellent Job!
A word of caution to anyone considering a similar project. If you change the thickness of the material on the landing, it will throw off your riser heights on the adjoining steps. In this case, the author replaced the thin linoleum with 3/4 inch Hardwood.
If we assume the riser height was 7 1/4 inches on each step, the new riser height on the last step coming up to the landing is now 8 inches and the first step going the rest of the way up from the landing is now 6 1/2 inches. The rest of the risers would remain 7 1/4 inches. This may not seem like a big deal but it can create a significant trip hazard. Our brains are trained to expect every riser to be the same height and any deviation can catch a toe or throw you off balance.
The other thing that can haunt you about this situation is when you go to sell the house. Most home inspectors will make note of mismatched riser heights as a hazardous condition. If you want the same effect without the riser issue, you might want to consider an engineered wood flooring (like Pergo, etc) which is thinner. It will still create a difference in riser heights but it will minimize the impact.
Conversely, if you are removing a thicker flooring and replacing it with a thinner product, you should DEFINITELY put down a thin sheet of plywood underlayment under the new flooring to match the height of the original flooring.
Ram says
Looks awesome!!! Love it.
Sarah says
How are the stairs holding up? Is the white corners on the steps looking dirty? I worry about dirt collecting there and looking gross.
Heather says
Actually, they are doing GREAT. They need to be vacuumed and swept, just like regular hardwood steps, for sure, but the white has stayed totally white 🙂
Jill says
Question…could you get away with painting the white from the wall to just under where the “runner” will be instead of painting everything white? Then the darker runner color would be applied to the mostly unpainted middle section? Otherwise painting the dark color over a lot of white. ??
Thank you. Love the project and am going to do the same on my garage steps.
Heather says
Sure, I think that would work! Just make sure your tape job is on point!
nicole houston says
Ok so I am now a weekend warrior myself! I have painted the stairs white with the paint you suggested (I am not doing the runner). Just finished the 2nd coat on the alternating steps and the first coat on the opposites this weekend. Unfortunately I see an issue already that maybe you can shed some light on…every single step we take is showing up on the white (barefoot and with shoes on)! I appreciate the fact that it wipes off easily, but what can I do about the marks showing up in the first place? A varnish perhaps?
Heather says
Hmmmm…we don’t have that happening here. Maybe because the part we step on is gray? I was going to ask you about shoes b/c we don’t wear them in the house. You could certainly use a polyurethane top coat, but be aware…they will cause yellowing of your paint. And you used porch/patio paint, right?
Janet says
They look beautiful and have inspired me to do my dingy basement stairs! I’ve already fixed the ceiling and painted that part. About to do the walls this week and then onto the floor. But I have a question…usually if I use painters tape, I remove it while the paint is still a bit damp so it doesn’t peel off what I’ve just painted. If you did two coats of grey, can you explain what you did with the painters tape inbetween coats? Thank you so much!!
Heather says
GREAT question Janet! So, this may sound like a commercial, but trust me, it’s SO true. Using the right tape for this project is so super duper important. We used the YELLOW Frog Tape, which is for delicate surfaces. We left it on through painting both coats, and as the final coat is drying/almost dry, we removed it with no issue. I highly, highly recommend using that particular tape for this job.
Janet says
Great thanks so much! I had a horrible experience with the green frog tape years back so I haven’t used it, or any tape really, since. But if you say so, I’ll give it a go! One last quick one…is the gloss finish slippery at all? Thanks!!!!!!!
Heather says
I haven’t tried the green frog tape, but I love they yellow for delicate projects. I was also worried about the slippery factor, but to me, they don’t seem any more slippery than our smooth hardwood steps. I hope that it goes well for you!! Lemme know!!
Janet says
It came out amazing! Thank you for all your help! I’d post a pic but can’t figure out how. But it’s beautiful!
Heather says
Post it on our facebook page!! I want to see it!!
melissa says
Attempting this now! I love it but am a bit nervous about getting the lines straight! Question, did you use a polyurethane top coat to help extend the life of the paint? I’m seeing that recommendation in most places but heard from the “paint expert” at Home Depot that it leaves a bit of a yellow tint.
Heather says
I did NOT use a polyurethane coat, Melissa. For the same reason. Did not want any yellowing. PLUS, if you use porch/patio paint, it should hold up to foot traffic anyhow. Ours certainly has! I’m thrilled with the performance, honestly. I figured it wouldn’t last too long, but we’re going on three years now, I think, and it still looks PERFECT. GOOD LUCK!! Would love to see pictures when you’re done!!
Lesley says
I’m desperate to ditch my shabby , smelly ( dog pee I’m afraid) stairs and landing carpet but really short on funds , and with little hope of sucess I googled ‘budget stairs makeover’ and found your project. Wow – it looks amazing and the results dont say ‘cheap and cheerful’ its a really elegant look.
I have a question about the paint you have used as we don’t have that brand here in the UK. Is it a solvent based floor paint , or a high grade gloss paint for wood , and how many coats of paint did you use? Whatever it is it seems to have stood the test of time really well.
Heather says
Hi Lesley! The kind of paint we used is a latex based, porch and patio exterior grade paint. It is on the glossy end, which helps to improve the cleanability. Less sheen = less ability to clean the scuff marks, etc. At the same time, TOO much sheen could make them slippery, so be careful. A paint specifically made for exterior porches/patios should give you the right combo of durability/sheen/etc. It is a paint made for wood, as well. We did two coats each of the white base and gray stripe/runner. Good luck!!
Sara Syrett says
Love these stairs! I am getting ready to tear the carpet off my stairs and I am looking for some inspiration since I really want to paint the stairs instead of installing new stair treads. I really have to convince my hubby though! Thanks for the inspiration!
Ta Morton says
I am preparing to copy your stairs (thanks for sharing the brand of paint and the colors) and would like to know far from the wall the first part of the painted “runner” is.
Thank you
Heather says
Sure thing, Ta. The gray starts 5″ from the wall. Good luck!
Genny says
I am attempting this with the stairs to our basement now too, I love it and looks SO much easier than the stained tread and painted kick plate that I was going to do (I’ll save that for the main staircase). I was about to ask for some more dimensions, so thanks Ta for beating me to the question, and Heather for the reply! Hoping to get my first cost of white down tomorrow.
Heather says
Great! Good luck! Let us know how it goes!
Mica says
We are doing this exact pattern right now to our stairs!!!
Heather says
Awesome Mica!! Post a pic on FB when it’s done! Would love to see it!
cate says
what color are the walls?
Heather says
Hi Cate! It’s called White Duck by Sherwin Williams
Lisa @ Recreated Designs says
What a gorgeous transformation! They don’t even look the same steps 🙂 Thanks so much for linking this up to the Bewitchin’ Projects Block Party. Hugs, Lisa
suzan says
Absolutely beautiful – especially love the colors !
Leslie Ibanez says
The 3-year-old carpet on our stairs looks horrible. I wonder if the Husband would let me do this. Thanks for the tutoriqal and the update!
Heather says
We had that same issue Leslie. We put really high end, supposedly durable carpet on a staircase, and it looks awful. If I were to do carpet again, I’d do a DIY runner w/ something cheap! This paint is holding up awesome, and it’s even cheaper!! You gotta try it 😉
Alaina says
I love how the stairs turned out. I have seen this on another blog but I like your color choice.
Kristin @ Postbox Designs says
I love it! It is so simple, but so beautiful too. I love any project that involves paint, it is my favorite “go to” 🙂 Thanks for the inspiration!
Heather says
I love it, and would like to copy it exactly for my stairs! I got a palm sander for Christmas, so I’m about ready to dive in 🙂 Thank you so much for the tutorial. I thought I’d have to go over it with a clear coat; nice to know I can skip that step!
DazzleWhileFrazzled says
I wish we had stairs in our house! I love the look of painted stairs. And kudos on the print feature. Visiting from DIY Like a Boss party.
Heather says
Thanks so much, and so glad you swung by!!
Claire says
Wow ! Looks great love the way it goes round the corner, you’ve done a really good job. My stairs are next on my to do list, they are currently carpeted but I want to get rid of the carpet and paint. I just haven’t got the courage to start, after seeing your post I think I will next week.
Heather says
Oh I hope you do Claire!! Would love to see yours if you decide to try it!!
Jasmin says
Well done! I was looking into painting my staircase all white and found, like you, it is not that common. Good that you showed that it does work!
Rebecca m says
Yep, really gorgeous! You and your husband must have the patience of a saint!
Heather says
I don’t know about patience of any saints…more like a large amount of lunacy, but hey, ya gotta use what you’ve got, right? Thanks Rebecca!
Marty@A Stroll Thru Life says
Gorgeous. I love it.
Heather says
Thanks so much Marty! That means a lot!
Dan says
You guys have inspired me. I am in the process of attempting this myself. Fingers crossed it look half as nice as yours… Well done guys and thanks! 🙂
Heather says
Best of luck Dan! Let us know how it turns out!
Sri says
Great job if not fantastic, grateful for you all sharing!