This article will show you how to quickly resize a Pinterest pin in Wordpress in order to optimize its’ performance…
In the spring of 2018, Pinterest made some big changes, or at least big revelations to pinners as far as giving us insights to the optimal pinterest pin size. And for many bloggers, myself included, what they said was NOT music to our ears.
For years, we were told that the “tall tower” approach to pin-making was the gold standard for creating our pins.

Personally, most of my pins were in the 1500-1800 px high range. Now, Pinterest has re-iterated that the ideal dimensions continue to be a 2:3 ratio of width:height. That wasn’t new information. However, Pinterest also let us know that pins taller than 1260 pixels in height could be truncated, or cut off (unless a user actually clicks on your pin to see more). No bueno.
So what are we to do with those tall towers? Do we start from ground zero on Canva or PicMonkey and re-create the entire pin from scratch?
I started down that road. And after several temper tantrums, I got smart. Or at least tired. And I figured there HAD to be an easy work-around I was missing. And there was.
This 2-minute video tutorial will tell you everything (and there’s not much) that you need to know in order to resize a pinterest pin. And the WHOLE process should take you less than 10-seconds per pin!

This 2-minute video will show you how to resize (scale) a Pinterest pin right now.
If you need a little visual hand-holding, no problem. I ❤️holding hands 😘. Here ya go:
How to resize a Pinterest pin in Wordpress
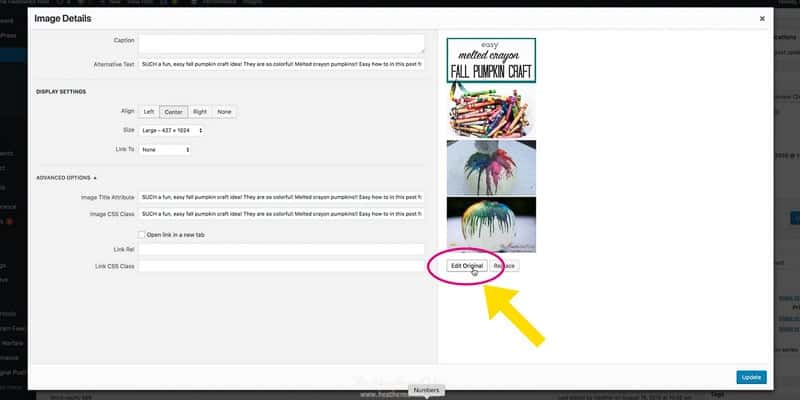
1. Click on the image of your pin in any post.
You need to be logged into Wordpress, and in your editor for any post where the Pinterest pin you want to resize resides. It doesn’t matter if the post has been published, or is a draft. Simply click on the image.
2. Click Edit Original.
When the image details page pops up, look right underneath the image. You will see a button that says “Edit Original”. Click it.
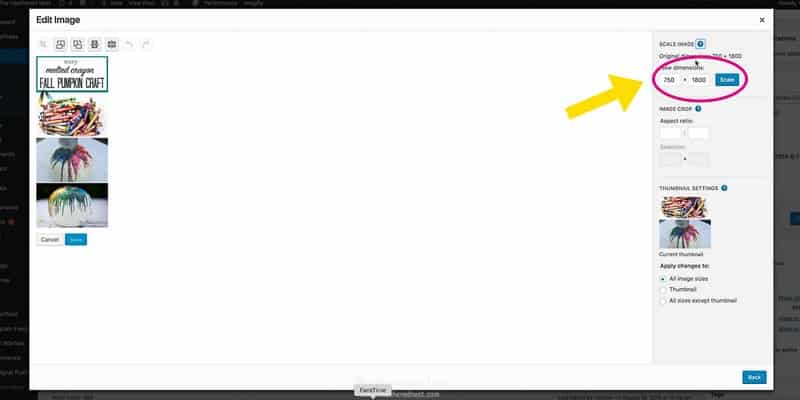
3. Change dimensions as desired.
All that’s left for you to do is change the dimensions of your pin. On the upper right side of the edit image page, you’ll see an area that says “new dimensions”.
Enter the HEIGHT you’d like your Pinterest pin to be. Remember that anything taller than 1260 pixels will be cut short on the Pinterest feed, so stay UNDER that height. The pin will be scaled to maintain the original proportions of your pin.
Click “scale” once the desired height is inputted. You’re done!
4. What if my Pinterest Pin is not 2:3? We have a Plan B.
FINGERS CROSSED that you are a rule follower, and have been creating pins all along following Pinterest’s best practices for the ratio of your pins.
Their 2:3 ratio is one that has been widely understood for many years now, and that part of the pin equation remains unchanged so far as Pinterest has shared with us. If your pins are 2:3, but are/were simply too tall, then the above trick should work great.
IF however, you are/have been a Pinterest rebel 😬, then the work around (and easy solution) isn’t so straightforward or attractive 😕.
Plan B is to edit the aspect ratio in Wordpress for our pin.
The video below shows how that is easily accomplished.
This video shows you how to edit the ASPECT RATIO of your pin, if it was NOT originally made to be 2:3. TAKE NOTE…you may have to CROP some of the original pin, which will likely not be ideal.
As shown in the video above, to change the aspect ratio, you will open the same image details window by clicking on your pin. Then, instead of selecting “scale image”, look below for “aspect ratio”. Type 2 and 3, respectively, into the appropriate boxes.
With the new ratio typed in, press and hold the “shift” key while dragging your mouse over the image of your pin shown on the left side of the edit image screen. Dotted lines will appear around the section of your pin that falls within a 2:3 aspect ratio.
If any of your original pin image falls outside the 2:3 aspect ratio parameters, it must be cropped out in order to fit the new aspect ratio 😞. You are able to select the portion of your pin that remains, but this option isn’t optimal because chances are, you will definitely be cutting a portion of your original pin off.
If you are ok with that option, then click the crop button (atop the image on the left), then the “save” button. Your newly cropped image in the 2:3 aspect ratio is now saved.
4. Don’t forget to pin your new Pinterest pin!
Take this opportunity to PIN your revised pin! You want your updated pin to be put out into the Pinterest ethos!
Pinning the new pin will look like fresh content in the eyes of Pinterest, which is great. Now you not only have a Pinterest pin that is sized appropriately according to the most recent best practices, but you’re adding “new content” to the platform. That’s a win-win for you, with a VERY small amount of time and energy exerted.
And I do love a good, lazy hack…don’t you?
5. Still having issues?
I do not claim to be an expert on all things Wordpress. But if you’re having image issues, or Wordpress issues beyond the scope of what I’ve discussed here in this post, I will happily point you in the direction I always go run to screaming with mascara running down my cheeks. And that’s my buddy Grayson, at iMark Interactive. He’s done a slew of tech-savvy stuff for me over the years that I don’t have the know-how to do myself.
If you’re in tech meltdown mode, I recommend heading to Grayson highly. In the blogging world, we’ve all had those moments. Myself? Those have numbered in the thousands at this point 😂.
I sure hope this tutorial has been at least mildly helpful to you!! It certainly saved me a LOT of hours spent revising pins to adhere to the newest guidelines. Happy pinning, people!
Pssst…before you go, I sure would love to hang out with you again really soon! Sign up now and get a no-cost copy of “Builder-Grade To Beautiful: 10 Totally Transformative Home Decorating Solutions, All Under $100!” Click here to enter your email or on the image below. Your copy will be emailed right away!


Leave a Reply