A DIY RV Fireplace with Airstone…
Today we’ll show you how you can add a DIY RV fireplace to your camper or RV with a durable and lightweight product called Airstone!

This is a sponsored post written by me on behalf of AirStone. All opinions are 100% mine. This post contains affiliate links. Please read our full disclosure policy here.*
More and more people are hitting the road these days in campers and RVs, both part-time and full-time. So the camper and RV renovation scene is hotter than ever.
A great way to update your camper and add a cozy touch is by installing a fireplace feature. Clearly, in a camper, a wood fireplace is a non-starter, but electric? Sure!
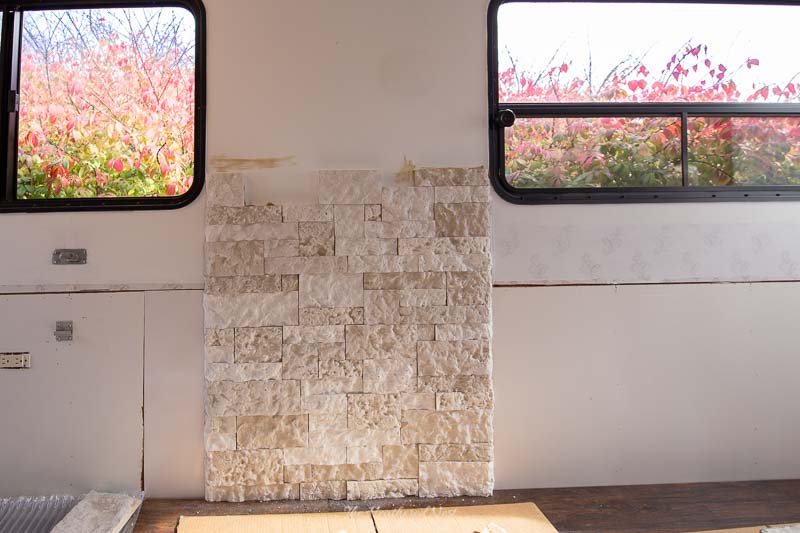
We added a DIY RV fireplace feature wall in our 36′ travel trailer recently. The project took about 6-8 hours to complete.
Since the weight of your camper, RV or trailer is a big consideration, a lightweight product like Airstone is a perfect solution.

This was how the bump-out/slide-out in our travel trailer looked before we started renovations:

The spot where my son is standing in the shot above is where we planned to put our RV fireplace feature wall.
Here’s another BEFORE shot from a different angle…

We planned to build an Airstone feature right between those two windows seen above. Airstone is a really versatile product.
It can be used for both interior AND exterior projects such as backsplashes, planters, outdoor kitchens, around your home’s foundation or pool, even around your mailbox.
Building an interior accent wall using Airstone is a pretty standard application. But this wall has a bit of an interesting twist since this fireplace feature is going inside the camper!

Last before shot above. The Airstone fireplace will be situated across from the kitchen area.
Before we move on, if you’re curious about the product, here is some helpful information from the Airstone YouTube channel:

Not only are Airstone products lightweight, but they’re also very easy to install, even for a novice DIY’er.
Airstone is available for purchase online or at your local Lowes.

All you’ll need is a few basic supplies to get your own DIY RV fireplace project started:

- Airstone (ours is Birch Bluff)
- hacksaw or circular saw (with masonry blade)
- construction adhesive (we used the linked brand)
- level
- this is the electric fireplace seen in our camper
Airstone provides very thorough tutorials for installing their products, including this helpful 3-minute installation video:

We won’t go through the full step-by-step process here.

But we’ll share a few helpful hints that we figured out along the way.

Airstone Installation Tip #1:
Use at least one 4″ tall piece of Airstone per row. If you don’t (and we learned this the hard way) you’ll end up with a long horizontal line across your wall.

It’s not a huge deal, but it can be a bit noticeable and distracting if your eye catches it in the wrong light.

Airstone Installation Tip #2:
Airstone comes in two different cartons: Their Primary Wall Stones (i.e. the “flat” pieces) and their Corner/Finished End Stones.
The Corner/Finished End product worked great in the narrow area where we installed the fireplace. This clever product has stones with one rolled end, so you can either pair one with its matching stone to create a 90-degree corner, or use the rolled-end stone at the end of each row, as we did, to create a finished end along the outer boundaries.

Check out the product descriptions online for more details.

Get ready for the “AFTER” shots!

For our project, which covered 16 square feet, we used (3) boxes, and all of them were the Corner/Finished End Product.

For the bricks used in the middle of the wall, we just cut the finished ends off.

Airstone Installation Tip #3:
As far as cutting the Airstone goes, we found that using a masonry blade on our circular saw (don’t forget a mask and goggles) was the quickest and easiest method for cutting.
You can definitely use a hacksaw, it will just take longer and be more difficult, in our opinion.

Overall Thoughts on This RV Fireplace Project:
1. Adding this fireplace accent wall made SUCH a dramatic change to our camper in a really short amount of time! The Airstone is well-made and fits together so well that once it was installed, there were absolutely no visible gaps seen between the pieces of stone.

2. Since adding lots of additional weight is a no-no in a camper or RV, Airstone was a great solution for this fireplace feature. It gave us a traditional stone look without the weight of real stone.
3. And unlike most tile installations that require grouting between the tiles, installing the Airstone was much easier for a novice DIY’er to accomplish. Really all there is to it is putting construction adhesive on the back, and sticking the pieces to the wall!

If you have other questions about this project, give us a shout either here by commenting on the post, or on any of our social media channels!
On the hunt for more simple home improvement ideas, and DIY home decorating inspiration? Be sure to check out these articles, too!
Pin this Airstone RV Fireplace post for later! And if you decide to create one, leave a comment (or better yet, a photo) on the pin! That helps others know whether they want to try this project, too!

Pssst…before you go, I sure would love to hang out with you again really soon! Sign up now and get a FREE copy of “Builder-Grade To Beautiful: 10 Totally Transformative Home Decorating Solutions, All Under $100!” Click here to enter your email or on the image below. Your copy will be sent right away!


Leave a Reply