Learn how to create a starched fabric wall treatment – (the backdrop of an awesome DIY art wall for kids)…
I had heard of a starched fabric wall treatment in the past, but I had never tried one myself. Typically, if I was looking for a wall covering, I’d go the wallpaper route.
But when we were figuring out a plan for an art wall we wanted to create for the kids as part of our $1000 kitchen remodel, I decided it was a perfect time to try the starched fabric technique.

Benefits of a Starched Fabric Wall Treatment (as compared to traditional wallpaper)
- relatively inexpensive
- more forgiving during installation
- easy to remove
- no damage to the underlying wall
As you can see, there are quite a few benefits to a starched fabric wall treatment as opposed to a traditional wallcovering, like wallpaper.


Looking for the sources for our kitchen area decor? They are listed below! Just click on any of the images to head to the vendor for more info.
Truthfully, unless you decide to use an insanely expensive fabric, going the starched fabric route will probably run you 80-90% LESS, cost-wise as opposed to wallpaper. That’s a HUGE savings. So it will save you time, money, and if you decide you want to change the look a year down the road, you won’t have to feel guilty about doing it.
You can even wash and RE-USE the fabric for another project! So it’s a very eco-friendly project, as well. Amazing, right?

Starched Fabric Wall Treatment & DIY Kids’ Art Wall Overview
As I mentioned, we recently updated our kitchen on a very tight budget. A $1000 budget, to be exact.
In this kitchen, we had a large, very empty wall. So I wanted to create some type of inexpensive, but cool focal point for the kitchen space.
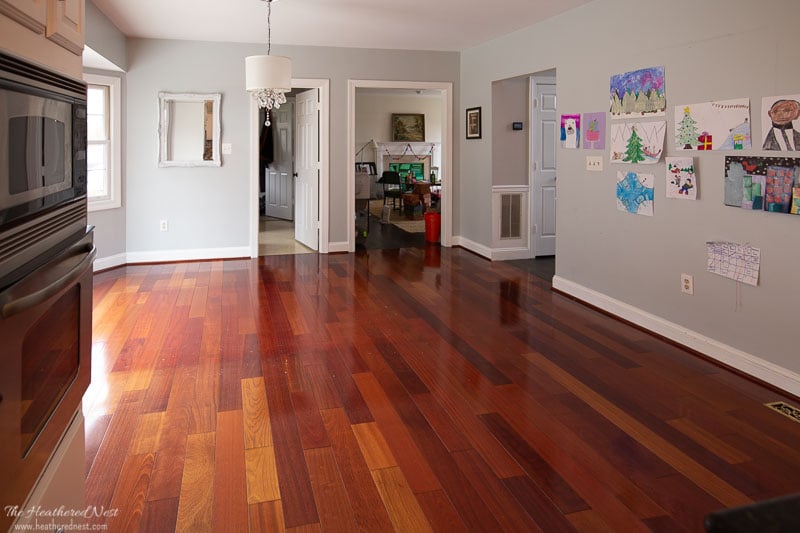
In the BEFORE shot below, you can see the wall that we used. It’s the one where we have the kids’ artwork already kind of haphazardly displayed on the right side of the image.

We didn’t have a great place to display the kids’ artwork anywhere else in the house, so the idea for an art wall in the kitchen became the plan.
Here’s another shot of the kitchen area below. This is how the kitchen looked when we bought the house. The area for the art wall is again on the right side of the image. That large, blank, yellow wall.

The goal was to make the art wall to look “special” for the kids, so they’d feel some pride when we hung their pieces. Kind of like an art gallery display.
So I decided that we would create a large frame with molding, and then use plexiglass to create a glass frame or cased look.

For the back of the display, I wanted to use fabric for a couple of reasons:
1.) I wanted the interior of the art display to be set off visually from the rest of the kitchen walls so that it created a distinct visual focus.
2.) By using fabric, I hoped you’d be less likely to see holes left by thumbtacks over time because the fabric would mask their appearance.
3.) The fabric I bought for $2/yard fit our (very tiny) budget!
I put together an overview video to get you started. It’s less than 2-minutes long and will give you a high-level idea of the process.
Check it out, and then we’ll move on to the step-by-step directions.

Starched Fabric Wall Treatment Video Overview
And now let’s run through the supplies you’ll need to get going on your starched fabric wall treatment…

Supplies You’ll Need For Your Starched Fabric Wall Treatment
- liquid starch (this is the brand we used and I’d recommend) – I used approximately 32 oz. for our wall which is 36 sq ft.
- paint roller tray
- paint roller
- paintbrush
- fabric of choice (purchase enough to have at least 6″ of overhang on all sides of your treatment area)
- box cutter/utility knife with several new blades
- rotary fabric cutting tool (not necessary, but helpful)
- yard stick
- plastic putty knife (for smoothing fabric)
Tips Regarding Fabric Selection
I’ve only done this with ONE fabric, but based on my experience, I’d say that this technique would:
- work well with most fabrics
- super heavy upholstery type fabrics may be a bit more challenging, but would probably work out A-OK with enough starch applied.
- the starch dries clear. I didn’t notice any real change in the color of my white fabric with the starch applied so you can use any color fabric you’d like to
- avoid really stretchy material…that will be harder to work with and get a good result with
- avoid very thin fabrics (unless you are after a translucent or see-through look)

How to Apply a Starched Fabric Treatment to Your Wall
1. “Paint” starch onto your wall.
If you are applying your fabric inside a frame, similar to ours, then you’ll first use a paintbrush to cut in the corners and any spots that will be difficult to reach with a paint roller.
Next, pour liquid starch into a paint rolling tray. Pour about the same amount of starch into the tray as the paint you’d use for the wall you’re about to starch (this process is really no different than painting your wall).

Now use a paint roller to completely cover the remainder of the wall you want to apply your fabric to with the liquid starch. Make sure the wall is completely covered. Small areas without starch will create areas where the fabric will not adhere.
Pssst…remember! Don’t leave here empty handed! Grab a copy of “10 Totally Transformational Home Decorating Solutions – All Under $100” now. Click here or on the image below to grab yours now⤵️
2. Starting at a top corner, adhere the fabric to your wall.
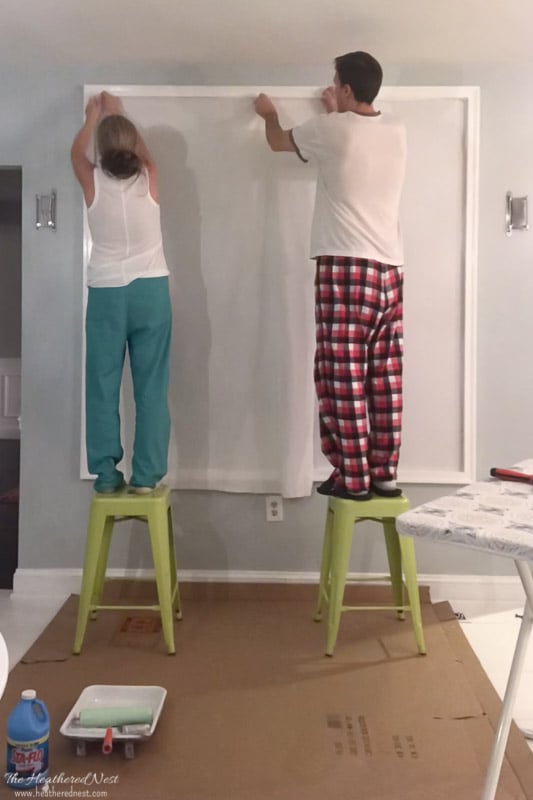
Grab your panel, or first panel of fabric and starting at one of the top corners of your wall, stick it to the starch. You want there to be an overhang of fabric on each side of your treatment for now. You’ll come back and trim the excess off once all your fabric is adhered to the wall and is the wrinkles have been eliminated.

Smooth out the fabric with a plastic putty knife. Using your hands is helpful, too.
A credit card, ruler or another straight edge would probably work fine as well…just don’t use anything sharp that could cut or nick your fabric.

The fabric will adhere, but loosely enough that it can be manipulated and moved around as you need to in order to make sure it’s straight and hanging how you want it to.
3. If you are hanging more than one panel of fabric…
overlap the panels by about 6″ or so. You’ll trim the overlapping fabric later. Overlapping the sections will prevent the appearance of gaps between sections of your fabric.

If the fabric gets super wonky anywhere, just peel it off the wall a bit and re-adhere. It’s very forgiving and easy to manipulate while the starch is wet (and it’s wet for at least a couple of hours).
4. Trim excess fabric.
With a new, sharp utility blade, it’s now time to cut the excess fabric from the perimeter of your wall treatment. If you have a big wall, then you may need to change your blade at some point. If your blade is dull, you’ll end up with fraying around your edges.

5. Cut overlap.
Where the fabric panels overlap each other, it’s now time to eliminate that overlap so that the panels sit side-by-side without any gaps between them.

Use your yardstick and a rotary fabric cutting tool or fresh blade on your utility knife to cut a straight line in the center of the overlapping area. You want to cut through both layers of fabric.

Then remove the cut fabric from both the top and bottom layers. And bring the remaining fabric of the two layers together. They should meet up perfectly.
Use your putty knife to get the fabric completely smoothed out again.

6. Add a top layer of liquid starch.
With all bumps, lumps and air pockets managed, add a top layer of liquid starch to the entire wall treatment.
Err on the side of going too heavy, rather than too light. More starch will help the fabric adhere…but don’t go to the point of adding so much starch it starts dripping down the wall.

7. Allow your starched fabric wall treatment to dry.
Step back and wait. We allowed ours to dry overnight.

And your starched fabric wall treatment is now complete!
Time to hang some art!

The kids love picking out which of their masterpieces will be displayed on the kitchen gallery wall.

I’ll post a tutorial soon on the DIY art wall gallery frame and acrylic cover we created.

The kids really love having their work displayed so prominently in our home. And I love it, too. The kitchen is the hear of our home,

so it’s only fitting that these little rascals who have captured so much of our hearts have a piece of themselves displayed here.
If you decide to create your own starched fabric wall treatment, drop a comment here or on the Pinterest pin, and let me know how it turned out! I’d love to see it!!
Pin this starched fabric wall treatment for later!

Pssst…before you go, I sure would love to hang out with you again really soon! Sign up now and get a FREE copy of “Builder-Grade To Beautiful: 10 Totally Transformative Home Decorating Solutions, All Under $100!” Click here to enter your email or on the image below. Your copy will be sent right away!


Connie says
Will this work with orange peel walls?
Heather says
Hi Connie! I had to look up what an orange peel was wall 😉 Now, I can’t tell you FOR CERTAIN, since I have not done it on that type of surface myself. But my gut instinct is that it would work great! I’d recommend trying it with a busier pattern. If you choose a solid, especially a light color, then that texture may show through your fabric. If you decide to try it, I’d LOVE to see how it turns out!!