
Turn a $2 rug into a boho DIY clutch carpet bag…
Today, you’ll get to turn a discount store rug into a beautiful, statement boho-chic DIY clutch! Bohemian style is huge right now, and this lightweight bag is one that you’re sure to get a LOT of compliments on. To which you can proudly reply, “thanks, I made it.”

And that’s pretty awesome. Personally, I’m no Louis girl. You can take your labels and shove ’em as far as I’m concerned. No conning this girl into spending her hard-earned coin on a handbag just because it has some highly coveted initials.
Nope. I’d rather save my hard-earned dollars for a dream vacation where I will happily dish some dough on fruity drinks with paper umbrellas, purchased from a swim-up bar. We all have our vices, right? Mine just happen to be “Miami vices”, “lava flows”, and “strawberry daiquiris.”
So if you’re a Louis gal, just skip right over this post. No hard feelings. I love my Louis tote-ing girlfriends more than I love my (also non-designer) luggage…yes, that’s a Steel Magnolias reference. But my Louis gals aren’t gonna be down with this particular post.
Because we’re gonna take a $2 rug from Five Below, and turn into a pretty chic, no-label-necessary, DIY clutch. This legit little carpet bag turned out SO cute. That said, RUN…do not walk, to your nearest Five Below while I know these things are still there!


Supplies Needed For Your DIY Purse
- small cotton rug (mine was 20″ x 26″ from Five Below)
- liner material (I used a neutral, scrap fabric I had on hand)
- iron-on interfacing (I used medium weight)
- optional zipper, button, magnetic clasp (I didn’t use any though)
**Note: If you don’t have a Five Below nearby, check your Dollar Store. I also found a couple of cool online alternatives for you, although NONE come close to the $2 price tag from Five Below!
DIY clutch carpet bag – How to assemble
Before we begin, I need to give a whole bunch of credit for this idea to a blogger I recently ran across, Holly from Love the Tompkins. She took this rug and turned it into a pillow cover. And I adored it! So I ran to Five Below, and luckily, these $2 rugs were in stock.
I also looked for some tutorials on turning similar items into handbags, since I have NEVER made a handbag before. I’d HIGHLY recommend any of these tutorials because yours truly has NO illusions that I am A) an expert with the sewing machine or B) know interfacing from an intercontinental breakfast (I don’t even think that’s a thing, right?).
Here are the ones I referenced for this project:
Anna Evers – DIY Rug Clutch
Modern Bohemian Lifestyle (she makes one from a placemat)

1. Decide on the size you’d like your bag to be.
Once you’ve collected your materials, decide on the size and shape you’d like your bag to be. I decided I wanted mine to be approximately 14″ x 9″.
I figured this out by folding the rug in different ways until I decided what size looked the best. Very scientific.
2. Cut rug.
Are you dancing? If you are, we should be friends. Back to tutorial mode for now though. I wanted to maximize the tassel-look on my handbag, so as I dissected the bag, I kept the section of fringe from the unused area of fabric. I ran a stitch down that area before cutting it so that it would be less likely to fray.
For a 14″ x 9″ bag using this particular rug (which was 20″ x 26″), I removed 3″ from both sides (of the 20″ dimension). Now, in reality, what I did was fold and iron those sides, rather than cutting them. In my mind, that was both easier and would prevent fraying.
In actuality, what that did was make this thing IMPOSSIBLE to fit under the sewing machine. So save yourself some time and effort by running a stitch down both sides of your rug, then go ahead and cut the rug before moving on.

The only length I cut off of the 26″ dimension of the rug was the fringe, as seen below.

3. Make pocket.
Adding a little pocket inside your bag isn’t required, but it sure is cute. And it makes the bag look kind of “official”, you know? The dimensions of my pocket are about 4″ x 6″.
I made mine out of the liner material. Use a 1/2″ seam allowance all around. Iron down 1/4″ around the perimeter. Sew the seam for the TOP of the pocket now. The other three sides will be stitched in shortly.

4. Make liner.
I made a liner for this bag out of some neutral-colored, scrap fabric I had on hand. It’s nothing fancy. Cut the liner material to the same size as the outside dimensions of your bag. Cut interfacing material to this same dimension.
Fold and iron 1/4″ (fold away from the “good side” of your fabric) along all 4 sides. Iron your interfacing onto the “bad” side of your fabric. Then, run a straight stitch along the perimeter of your liner fabric. Now you’ll have a clean-sewn line around the whole liner. Cut off any excess interfacing and liner material from the back.
5. Sew in your pocket.
Now sew both the sides and bottom seams of your pocket onto your liner. Make sure to position this in the right spot. You’ll want it dead center width-wise.
Fold your rug as it will be when completed, and make sure that you’re positioning the pocket so that it’s on what will be the backside of the purse, once complete. I just eyeballed it.
6. Sew on the additional fringe.
Once again, this is not necessary, but I wanted my bag to have as much fringe as possible. So I took that scrap piece I salvaged from the other end of the rug and sewed it on top of the existing fringe.
I staggered it slightly so that the tassels didn’t lay on top of one another, but rather side by side.
7. Sew in the liner.
Sew in your liner using a straight stitch along the whole perimeter of your liner fabric. Remember you’ll be sewing the liner to the backside, or inside of your rug!! It should look like the image below when complete.

8. Fold DIY clutch and sew sides.
Last step! Now, for me, this part was torture because, by this time, my material was SO THICK I couldn’t use the machine for the most part. I ended up hand-stitching much of the sides.
If you were wise though and cut most of the bulk from your rug/cut the excess, it should still work on your machine without too many expletives being required.
Fold your bag in thirds (almost) so that your top flap will land where you want it to land when the bag is closed. For mine, that was about 3″ shy of the bottom. You should fold the bag inside out so that the liner is on the outside. Stitch the sides of the bag together. You’re done!!

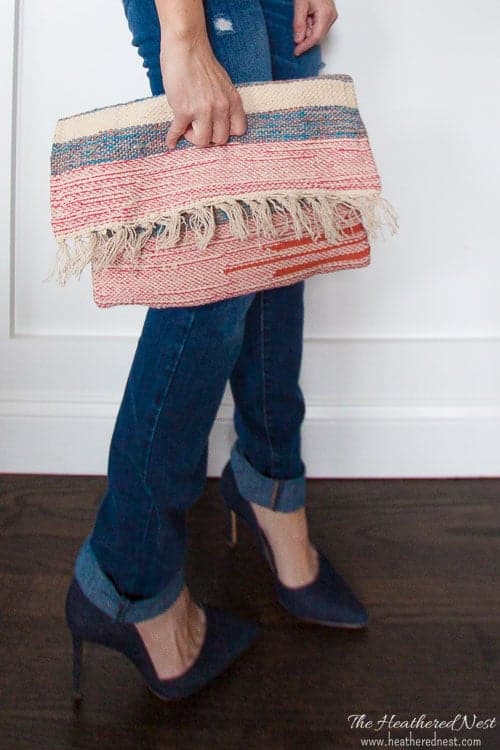
My seamstress skills are very limited. But the bottom line is that this is a pretty easy project,

and I think this $2 rug makes SUCH an adorable boho DIY clutch, doesn’t it?!

I’m pretty sure this little gal could hold her own in a room of Louis’, Kates and Hermes, Pradas, Torys, and Michael Kors. I’ll take my little $2 handbag over those jokers any day.
Catch you cats later. Mama’s tired. I think it’s time for a Miami Vice.
On the hunt for more simple home improvement ideas, and DIY home decorating inspiration? Be sure to check out these articles, too!
Pin this post for later! And if you make one, leave a comment (or better yet, a photo) on the pin! That helps others know whether they want to try this project, too!

Pssst…before you go, I sure would love to hang out with you again really soon! Sign up now and get a no-cost copy of “Builder-Grade To Beautiful: 10 Totally Transformative Home Decorating Solutions, All Under $100!” Click here to enter your email or on the image below. Your copy will be emailed right away!


illy junus says
I love this, thank you so much for the ideas
Akaleistar says
That clutch is so cute! What a great way to use a rug 🙂
Heather says
THANKS so much 🙂 Glad you like it!!
Julie says
I’m with you on the not splashing out, my most expensive bag ever was about £40 from TK Max for a nice leather bag (which I still have so I guess that was worth it!)
I was wondering how you managed to stitch this, as I was thinking my machine would not be up to it, but hand stitching the bulk sides makes sense.
It’s lovely and well worth that $2 you invested!