


How to build a DIY bike rack for your garage…
Have you seen that show “Storage Wars”? The one where junkers buy abandoned storage units? Then there’s a moment when they lift the garage style door of the unit to reveal mounds and mounds of, well, junk?
We offered to have our garage be casted for that show, and they politely declined. “Too much junk”, they said. We couldn’t argue. And that’s when we knew we had a problem.
So we started to purge. And then we started to organize. And the organization was proving difficult, as our garage is a catch all.

The need for a bike rack & outdoor toy storage is real
Lawn equipment, college text books, junked up furniture, or “treasures” my wife finds by the roadside…ALL OF IT, and more, lives in our garage.

But none of it had an actual spot in there. It was all just mounded up, strewn wherever there was an available square foot or couple of inches to spare. We struggled the most with all the kids’ junk…especially those big, bulky ride-on toys.
Why is it that the littlest people seem to have the MOST stuff?
Bikes, scooters, big wheels, plasma cars…I found myself constantly tripping over them or kicking them out of the way.
So in an effort to save my shins from yet another bruise, I decided to launch into creating a permanent home for the bikes. I scoured the internet for bike storage ideas, and decided to built this homemade bike rack out of some 2×4’s, and the kids love this thing.
They now have their own, personal, VIP parking spots. A claimed stake to a little parcel of real estate they can call their own. We’ll show you how to design and build your own homemade bike rack.
And before we move on, if you could use some more organizing and less clutter in your life, you’ve come to the right place! Grab a free copy of “60 5-minute decluttering ideas” and get on the road to a calmer, more restful home life in as little as 5-minutes at a time!

Back to the bike rack. This one was made for 3 bikes, but you can adjust yours to fit more or less vehicles. As I was building this, I figured out that there was some extra storage space created that was a built-in bonus! Keep reading to find out…
Below is a quick and dirty overview of the project via video:

DIY Bike Rack Video Tutorial
Next, let’s talk about materials and supplies you’ll need for your DIY bike rack…

Homemade Bike Rack Supplies
- 2×4’s…you’ll need seven 8’ long 2×4’s
- 2-1/2” screws
- tape measure
- rafter square (or something that measures a 45 degree angle)
- drill/driver
- chop saw or circular saw
- Kreg jig

Homemade Bike Rack Step-by-Step Directions
1. Make a plan.
My wife kinda scoffs at this step…
But trust me, if you have similar compulsive adorable tendencies as my wife, i.e. throwing yourself headlong into a DIY project without having thought through all the nitty gritty details, STOP YOURSELF…NOW. Trust me here that A PLAN will make EVERYTHING go smoother.

Lay out the bikes (we will be working with three in this tutorial) to see how much space is needed, in total. I wanted it to be easy for the kids to get their bikes in and out of the bike rack without the handle bars hitting each other, so to make that happen, I found that I needed about 24” between each bike.
With this figure in mind, I sketched out the rack on paper, and decided that the over all length of the bike rack would be 58”.
2. Find space.

Sometimes just carving out some dedicated space in a garage or other area already packed with stuff will be the biggest challenge of this whole project!
Find a space in your garage/shed/or wherever your homemade bike rack will live so you have some defined dimensions to start with.
The overall size of your rack may need to be adjusted depending on the space you have to dedicate.
3. Determine the required DEPTH.

This was a bit of trial and error, but I came up with an overall depth of 19” (this is the outside dimension of the whole rack from front to back, including the width of the 2×4’s in the frame).
Our largest bike has a tire diameter of 20”, so if your kids’ bikes have the same tire dimension, you can probably use the same dimension here.
If your tires are larger, you may need to increase the depth of your DIY bike rack.
4. Build your base.

The bike rack base will be composed of 4 pieces of 2×4, 2 long (58″ each), and 2 short (12″ each). Cut these pieces using the chop saw. Once cut, lay your four pieces out on a flat surface. Then screw the four pieces together.
I used the Kreg jig to make pocket holes in the 12″ pieces. We have mentioned the Kreg Jig in other posts…great tool. I highly recommend it. We use it a few times in this project.
Once these are screwed together the overall outside bike rack frame dimensions should be 58″x19″.
5. Create pocket on base to hold bike tire.

Based on the width of the tire, I decided to make the pocket 3” wide. This pocket will hold the front bike tire.
To make this pocket, you will need to cut an additional 4 pieces of 2×4, each 12″ long. Once cut, use the Kreg Jig to make pocket holes in each of these 12″ pieces. Then screw them into the frame. Your base is done!

Above is a shot of the BOTTOM of the completed base. Flip the base over, and we will continue by adding the upright sections.
6. Cut upright/angled sections.
Creating the angled pieces that make up the uprights is the trickiest part of this DIY project. But don’t worry…I’ve done all the math for you. Even broke out the Pythagorean theorem…remember that from high school? These uprights will be constructed of 2 angled 2×4’s for each bike housing.
For our bike rack, we need room for three bikes, so we will be cutting 6 of these pieces. These are installed at a 45 degree angle, so use a rafter square to measure your 45 degree angle on one end of your first 2×4.

Then, cut along your mark using the chop saw.

Once you have cut the end at 45 degrees, measure 22″ on the LONG side and cut another 45 degree angle.

Now you have to cut the second piece (the rear/vertical upright). Measure 15.5″ and then cut a 45 degree angle on this board, again using the rafter square.

For this second piece you will also want to use the Kreg Jig to and put two pocket holes at the base of this board…this will allow you to easily attach it to the base.

Screw these two pieces that form the upright section together.

Set this section up on your base and screw the vertical upright to the rear of the base, as shown below.

Then screw the slanted portion of the upright to the front of the base, shown below.

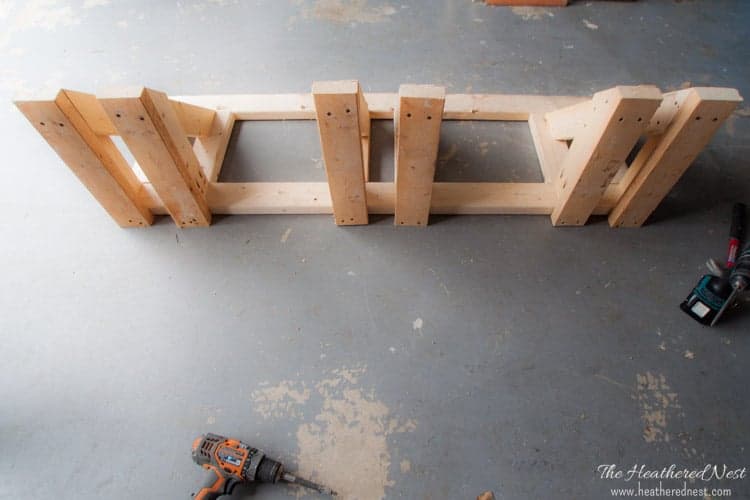
Now repeat this 5 more times, for the remaining upright sections.

When all 6 uprights are attached, your structure will appear as above.
(Quick note…if your bike rack is a different depth than mine, you can’t use the same measurements I used. You would need to cut the first 45 degree angle, hold this piece on the base and measure from the base up to this piece to get the length you want and then cut your second 45 degree angle.

7. Bracing.
The hardest part of the assembly is done! We’ll just add a little bracing to make the structure stable. First, we add 2×4’s to the back of each of the vertical supports in the rear of the bike rack.

Remember, you need to add 1.5″ to the length of these supports to account for the height of the base 2×4…so these are 17″ long (15.5″ + 1.5″ = 17″).
Place one of these 17″ vertical 2×4’s behind each upright angle supports, 6 in total.
Now add a 2×4, (58″ in length) on top to tie it all together.

Screw the top 2×4 in place.

Your homemade bike rack is now finished!
And your garage is one step closer to actually being used for what it was intended…housing a car.

Go ahead and park those bikes!

8. Bonus!
Now for the bonus storage. As if building this bike rack was not reward enough…wait! There’s more! Many kids have these “plasma cars” and those things are a pain to store too! Just plain dumb luck, but this bike rack offers a great place to store the plasma cars with no extra modification!
Just stand the plasma cars on the rear wheels, and place them in the gaps between the bikes…voila…instant plasma car storage. I was pretty happy with that. Told my wife I planned it that way, too.

Hope you’ve found this DIY project helpful. We’ve got a ton more DIY ideas and organizing inspiration where this came from…be sure to check these out!
Pin this post for later! And if you make one, leave a comment (or better yet, a photo) on the pin! That helps others know whether they want to try this project, too!

Feeling inspired to declutter? Keep the momentum going! Here are 60 places you can declutter at home in just 5-minutes at a time. Grab your free copy now by clicking here or on the picture below:


Matthew says
I posted a comment earlier but have figured it out. I had asked about the number of 58 inch pieces and 12 inch pieces. I see it’s 2 each for the outside frame.
Now, I’m stuck on the inside measurements. I am going to build this with four slots for bikes. You mentioned 24 inches between bikes. What is the width that makes up the “larger space” between the slots for the bike. I’m not explaining this well but I’m assuming it’s not 24 inches – something smaller than that. I know it’s 3 inches between 12 inch pieces to create the slot. I’m trying to figure out the other distance. I hope that makes sense.
Thanks!
Matt
Heather says
Hey Matthew! It does make sense. Dave is checking on it for you now and we’ll get back to you ASAP!