


How to paint Wood Floors Without Sanding (AKA the lazy way)…
Wood enthusiasts, be advised to divert your attention elsewhere on the web right now. Because this post is about how to paint wood floors. And not even how to paint floors the super professional way. Nope. We are going to show you how to paint wood floors the lazy way, meaning how to paint wood floors without sanding.
OK wood lovers, go ahead with that collective gasp and close this tab on your browser. Paint lovers? Read on…

* If you’re looking for the full $1000 Kitchen Makeover Reveal Post, that’s here *
If you’re considering painting your hardwood floors, I’m guessing that you have one (or more of) these issues at home, as these are the top reasons most people consider painting their hardwood floors:
Top Reasons People Consider Painting Hardwood Floors
- Current hardwood floors are in bad condition (& you don’t have the budget to replace)
- Current hardwood floors are outdated (& you don’t have the budget to replace)
- Love the look of painted floors (this isn’t about $$)
Want to see the wood floor painting process (without sanding) at high speed? Here’s how this DIY project looks when done in less than 2-minutes:

If you decide to move forward on your wood floor painting plan, here’s what you’ll need to get the job done…

Supplies Needed For Painting Hardwood Floors
I’ve linked to the exact brands I recommend for the paint and primer!
- GOOD primer
- Naps/paint roller
- Porch and patio paint, sheen of choice (I used gloss enamel, but it’s also made in low lustre)
- Paint pole extender
- Painter’s tape
- Mop/broom/cleaning supplies
- Sanding Tool and sandpaper (if you’re doing this the right way, not the lazy way). This could be any/all of the following:
- Orbital sander (AKA palm sander)
- Belt sander
- Rent a professional grade floor sander
- Painter’s plastic (hang it around the room you’ll be sanding to cut down on the dust if you go the sanding route)
Oh, and before moving on, if you’re the type who loves decorating your home BIG time, but on a small-time budget? Then you’ll want to grab a free copy of “Builder-Grade To Beautiful: 10 Totally Transformative Home Decorating Solutions, All Under $100!” Click here or on the image below. Your copy will be sent right away!

How To Paint Your Hardwood Floors
1. Sand your wood floor (??)
AKA to sand or not to sand, that is the question.
Sanding your floor first is an important part of the DIY equation if you really want to MAXIMIZE the durability of your floor paint job. That’s a fact. This could be done one of several ways, depending on the size of your floor:
- If your hardwood floor area is LARGE:
- Consider renting an industrial grade sander at a local tool rental company.
- Never heard of a tool rental company? They are EVERYWHERE. Just google “tool rental near me” and hopefully some hits will pop up.
Home Depot rents these types of sanders through their own power tool rental program as well.
(We rent tools all the time that are too expensive and aren’t used frequently enough for us to purchase. Think of things like scaffolding, stump grinders, gas-powered post hole diggers, and industrial floor sanders).
- If your hardwood floor area is SMALLER:
- Try a handheld palm and/or belt sander
Now that I’ve said you should sand your floors, I’m going to say something shocking and inappropriate…
YES. You should sand your wood floors before painting them. That said…I didn’t.
And maybe you don’t have to, either?
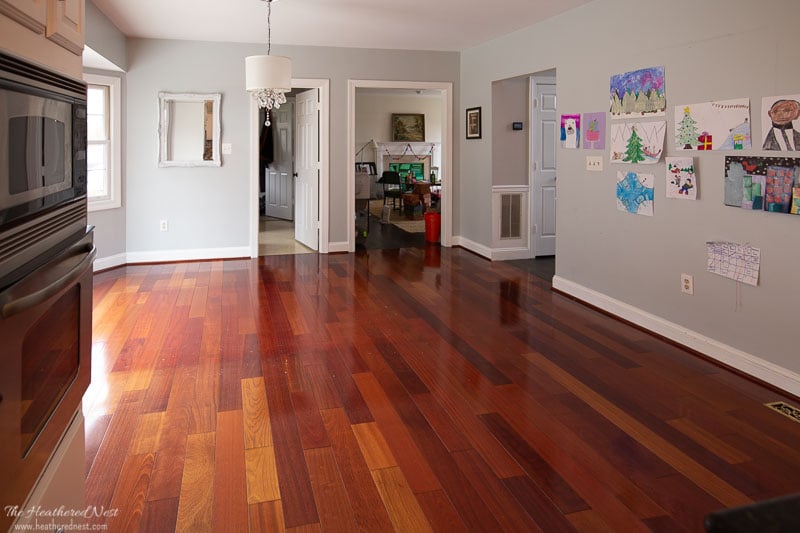
I painted the floors the lazy way…i.e. no sanding. I know, I know. So bad, right? Here’s the deal. The wood floor in our kitchen is nearly indestructible. It’s Brazilian cherry, which is a very hard wood, to begin with.
Plus, our floors are not the kind that are installed, then stained in place (that would make the finish easier to remove/sand down).
Instead, these floors were purchased with a factory finish, meaning the finish is almost impossible to get rid of.

I had tried to sand these suckers years ago because I’ve loathed the kitchen floors for as long as we’ve owned the house.
But no matter which sander I used, and no matter which grit I tried, that finish would NOT scuff. Not even a little bit. So I figured my painted floor dream was done. If I couldn’t sand, then painting the wood floors wasn’t an option.
These Mo-Fo hardwood floors would NOT be sanded.

Soooooo after years and years of living with hardwood floors which I loathed, trying to wait patiently until we had enough money to get new floors, I caved. I decided to paint the floors.
I had come to the decision that even if the paint chipped and flaked almost immediately, I’d still be happier with that outcome over living with the cherry floors I despised even one. more. day.

Here’s the bottom line on sanding vs. no sanding
I’m not here to guarantee that you will have a great, or a horrible outcome painting your wood floors without, or even with, sanding. Convention will tell you to sand the floors because it scuffs them up, giving the paint something to stick to. And that rationale makes sense.
That said, in my experience thus far (at the time of writing this post my floors have been painted for four months edit: 4 years!), painting without sanding has worked just fine!!
The paint has not chipped or flaked off anywhere. So it’s really your call, and it’s kind of a gamble. I’d ask yourself a couple of questions before deciding either way, and those are:
Questions to ask yourself before deciding to paint wood floors without sanding (i.e. the lazy way)
- Can I live with the floors if they don’t look perfect afterward and they start to show signs of wear and tear?
- Is this a short-term or a long-term solution?*
- What kind of wear and tear is this floor going to see? (i.e. do you have big dogs? Kids running through the house with black-soled shoes?)**
- Is this floor in a rental apartment that you live in, or are a landlord for?
*if the answer to question #1 is short-term, that’s an easier decision…why not go for it?! If it’s a long-term plan, then that’s tougher. You’ll then have to resign to the fact that at some point, you’ll need to re-coat with paint. Also, if you think you may sell your home any time soon, consider the effect on resale.
**The more wear and tear the floor must sustain, the more scuffs, stains, dings etc. you’ll start to see. Now, it’s true that’s the same with ANY floor, but if you paint, especially white, these issues will be magnified.
Also, the paint color you pick matters. White will show more “issues” from dirt to dings and everything in between. Darker will be more forgiving, so factor your desired paint color into this decision.
Pssst…remember! Don’t leave here empty handed! Grab a copy of “10 Totally Transformational Home Decorating Solutions – All Under $100” now. Click here or on the image below to grab yours now⤵️
2. Clean your wood floor
If you sanded your floors, then this step is especially important. You need to remove all the sanding dust, as well as any dirt, grime, etc. before painting.

Personally, since I didn’t sand, I just swept, vacuumed, and mopped with a Swiffer pad, nothing fancy.
I did read through the Behr surface preparation guide (that’s the brand of porch and patio paint I use) for weathered wood just to make sure there wasn’t something more official to tell you guys, but they just recommend cleaning and rinsing as well…no particular cleanser/solvent/solution is named.
3. Prime
This is the most important step in the painting process. PRIMING. It is imperative to choose a good primer. THIS is the one I swear by.
Honestly, I think that priming is the lynchpin to this whole hardwood floor painting process. If you don’t use a good primer or skip this step, then you are not going to love the outcome of your project, I’m willing to bet.

Before slapping on the primer, take the time to tape your baseboards, and you’ll also have to cut in the perimeter of your floor with a paintbrush.
I always use my old standby, which is this 3.5″ angled paintbrush…cannot start a painting project without her. Home Depot used to carry this brand, but for some reason, they no longer do :(.
Once you’ve cut in with your paintbrush around the perimeter of the room, it’s time to roll. Using a paint pole extender will make this project much easier on your back.
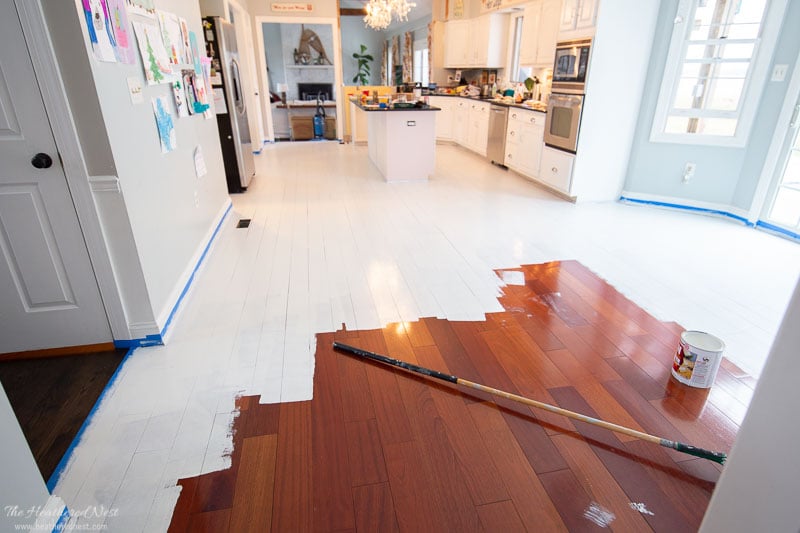
Since I was starting with a very shiny floor that had not been sanded, I decided to paint on TWO coats of primer. Necessary? I’m not sure, but I’m glad at this point I made that decision.
4. Paint
Once the primer is dry (and make sure to follow the directions on your primer as far as drying time goes), it’s time to paint!
I wanted white floors, so originally, I decided to use Behr porch and patio paint in a glossy sheen straight outta the can. BUT THEN, once I saw it on the floor, it felt way too blue and cold to me.
I actually LOVED the color of the primer. Odd? Maybe. But rather than going and getting 85 white paint swatches, I decided to have them custom color match the paint to the primer color! It was just a slightly warmer white…similar to what I’d imagine Benjamin Moore Simply White would look like if cut by about 33% or so.
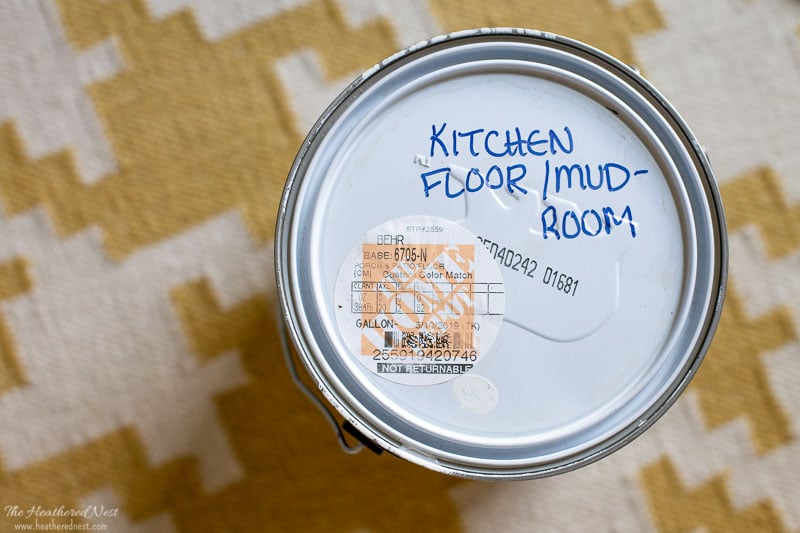
If you decide you want your painted wood floors to be the same color as ours, snap a pic of the label on the top of the paint can shown above, and take that to your paint store. That should allow them to custom mix your wood floor paint. Ours, again, was done at Home Depot.
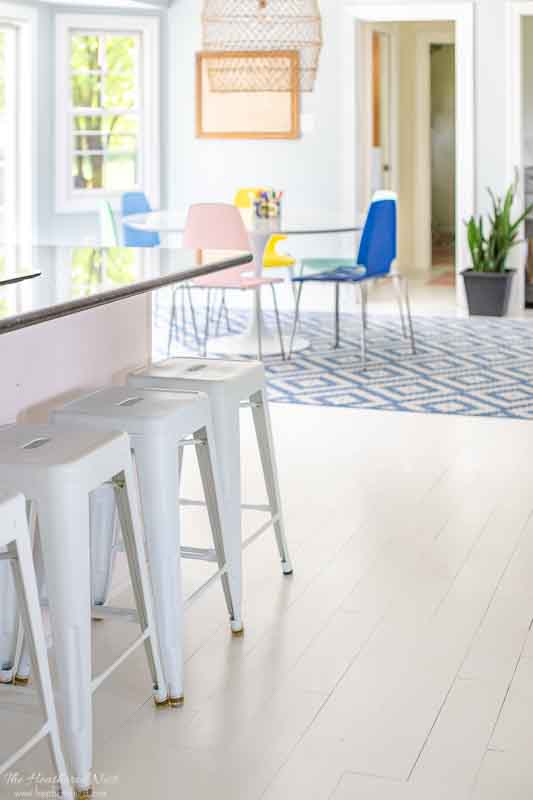
I used two coats of paint (plus the two coats of primer) in total on the wood floor. Let’s start showing you some shots of the finished painted wood floors!

5. Should I add a sealer?
Short answer? No.

Long answer? You could add a coat of clear polyurethane on top of your painted hardwood floors after the two coats of porch and floor paint. I wouldn’t recommend it, however.
The reason for this is three-fold. First, porch and floor paint is made for this application. It should hold up without the need for a coat of polyurethane.

Second, polyurethane has a very powerful odor. If you add poly, then you’ll need to by out of the house for at least several days after the application to avoid getting bowled over by the fumes.
Finally, although clear polyurethane says it’s clear, it will yellow your floor.

Nope. at this point, all you really need to do is sit back, relax, and watch the paint dry. No, you don’t need to do that literally. Unless you need an excuse to rest for a while and enjoy a cocktail.
Do make sure you wait the recommended cure time before walking on the floor or testing out your new painted floor finish too much.

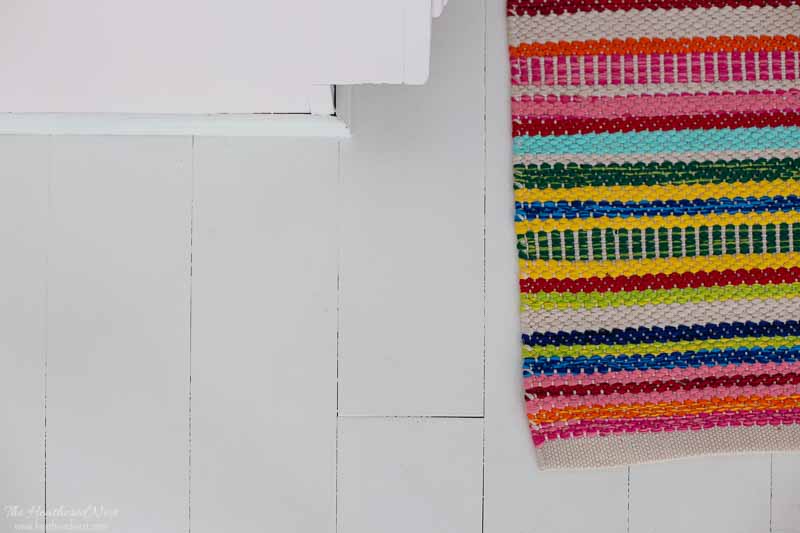
So at this point, you’re done! No more outdated floors here! Our own are bright, white, and the look lets in tons more light! At the time I’m writing this tutorial, we’ve had the painted wood floors finished for about 6 months 4 years!
There are three kids living here, no pets (except our guinea pigs). So far, they have held up AMAZINGLY.
That said, I have a couple of words of caution for you…
Precautionary Words | Wood Floor Painting Tips
1. I’m not sure how these painted wood floors would hold up to dog/cat nails. If you keep their nails really trimmed so you can’t hear them on the floor, then my assumption would be it should be fine…but you know what they say about assuming 😉
2. We do not allow shoes in the house…especially shoes with black soles…that would be a recipe for scuffs all over the place. Granted, they’d probably come off, but I don’t really want to find out.
3. You DEFINITELY see more dirt when your floors are white. Personally, that doesn’t bother me. I’d rather know it’s there so I can clean it up rather than living in filth unknowingly. But I may be in the minority on that front.
4. We put furniture pads on the bottom of ANY piece of furniture being used on this surface. Better safe than sorry. And on that front, we’ve been through numerous styles/types at this point and this kind is currently our fave type of furniture pad.
5. We definitely vacuum and sweep this floor all the time, and so far, no marks or scratches from that.
6. I do NOT expect this paint job to last forever. If I had to guess? I’ll probably want to re-paint in about 3 years. THAT SAID, I thought our painted stairs wouldn’t hold up, and they are going on 5 years, and look as good today as they did when they were first painted! Same can be said for our painted floor rug!

On the hunt for more home improvement ideas, or budget-friendly home updates and decor inspiration? Definitely check these articles out, too!
Pin these painted hardwood floors for later!
And if you paint your own wood floors, leave a comment (or better yet, a photo) on the pin! That helps others know whether they want to try this project, too!

Pssst…before you go, I sure would love to hang out with you again really soon! Sign up now and get a no-cost copy of “Builder-Grade To Beautiful: 10 Totally Transformative Home Decorating Solutions, All Under $100!” Click here to enter your email or on the image below. Your copy will be emailed right away!


Stephanie L Arnold says
Do you think I could use this method to paint a laminate wood floor? I love the way yours turned out!
Heather says
Hi Stephanie! Do you have an area you can test it on? That’s really the best way to tell. Like inside a closet or under the fridge? I’d try putting a coat of the primer down, then try to scrape it, etc. to see how durable it is. If it seems to have taken well, then you’re probably good to go. If not, don’t proceed. I wish I could tell you for sure myself, but having never done this on that surface, I definitely don’t want to steer you wrong!
Lisa says
Have you repainted them (going on five years you stated I think lol). ? I painted our stairs all white with floor paint and the dog and cats nails have made scratches of course (I knew they would beforehand I’ve touched up the stairs a few times). My next project after I put a coat of polyurethane on my painted stencilled tile floor in the laundry room, ( the tile was green ) I will start painting the wood floors in the bedrooms. Thanks for the Inspiration Your floor looks great !
Heather says
Hi Lisa! Did you use porch/patio paint? We don’t have dogs/cats, so I don’t have experience in that realm. Our stairs (that’s now been I think 6? years?) still look amazing. No need to paint them anytime soon. Now the kitchen floor, which is the post you’re writing this comment on, those floors DO need another coat of paint some time soon. In fact, I may do that this week. On ours, it’s mostly scuff marks that I’m unable to remove. No chips in the paint or peeling, etc. It’s just looking pretty dingy at this point. But since it’s a flat, kitchen floor, it will be pretty fast/easy to just roll on another coat. Stairs are definitely more time-intensive!!
Tish says
Looks great. Do you remember how many gallons of paint and primer you had to use? My room I’m going to do is about the same size. Thanks 🙂
Heather says
hmmmmmm….Tish, I think it was about 3 gallons primer, and 3 gallons paint, but it’s been a while, so I’m not positive on that.