


An easy Christmas gift wrap idea using pom poms…
There’s old school rap, and new school rap. I’m more of an old school gal. But if we’re talking wrap, as in Christmas gift wrap, I’m definitely a new kid on the block.

Speaking of NKOTB, did you know they had a Christmas album?? And yes, I am several decades late to this party because I JUST found this out. And I hope I am not alone in celebrating this discovery.

NKOTB…that’s old school, right? And I’m trying to talk about new school wrapping. In the olden days, as in last year (and all the Christmases before that), I was kind of a wrap-a-phobe.
Why? The art of gift-giving is not one of my own gifts, if you know what I mean. Much like some get “writer’s block” I have chronic gifter’s block.
So by the time I’ve mulled over, debated with myself, finally decided upon, and bought a gift…I’m done. I have no gas left in the tank to go that extra gift-wrapping mile.
But for some reason (and I know EXACTLY what that reason is, but I’m embarrassed to say), this year was different. I somehow found the time and energy to get my wrap on, and when I go in, I go ALL in. I’ve been a rockin’ wrapping fool.
Sometimes even a rapping WHILE wrapping fool. Don’t hate. I can bust out some Snoop-D-O-double-G when the mood strikes.
And apparently, the mood strikes while getting my Christmas gift wrap on.
I kind of toyed with different ways to execute this, so I’ll show you what I figured out to be the easiest method. First, here’s what you’ll need for this gift wrapping idea…

Video Tutorial: Pom Pom Gift Wrapping
This quick video tutorial will show you all you need to know about this Christmas gift wrap project:
If that video above didn’t show you all you needed to know…

Here are some written instructions. As far as supplies go, here is what you’ll want for this wrapping project…

Christmas Gift Wrap with Pom Pom Decorations Supplies
- pom poms (we specifically used this brand/mix, or I also found a more traditional Christmas color pom pom assortment
- hot glue/hot glue gun
- Christmas cookie cutters
- I like how the brown craft paper looked with this project, but you can used whatever you’d like!
- ribbon/other embellishments/tags if desired – I used satin ribbon. My other personal fave is baker’s twine
Christmas Gift Wrap with Pom Pom Decorations Directions
1. Wrap gift, as desired.
I chose to use brown craft paper for this project, but feel free to Young MC it, and bust your own move.
We don’t bake much around here, but the Christmas cookie cutters definitely come in handy for this project!
I tried several different methods for this project (cutting out a template and gluing over that, freehand drawing desired shapes, leaving the cookie cutter on while gluing) and eventually decided this way was the easiest…
Wherever you’d like your pom pom decoration to go, using a pencil, simply trace the outline onto your wrapped gift. Once traced, remove the cookie cutter.
4. Glue pom poms onto package, inside your outline.
Now just glue on your pom poms. Be very careful to stay inside your outline though. If you stray too far, your snowman will end up looking like a snowball. Your gingerbread man will look like a ginger-blob. You get the idea.
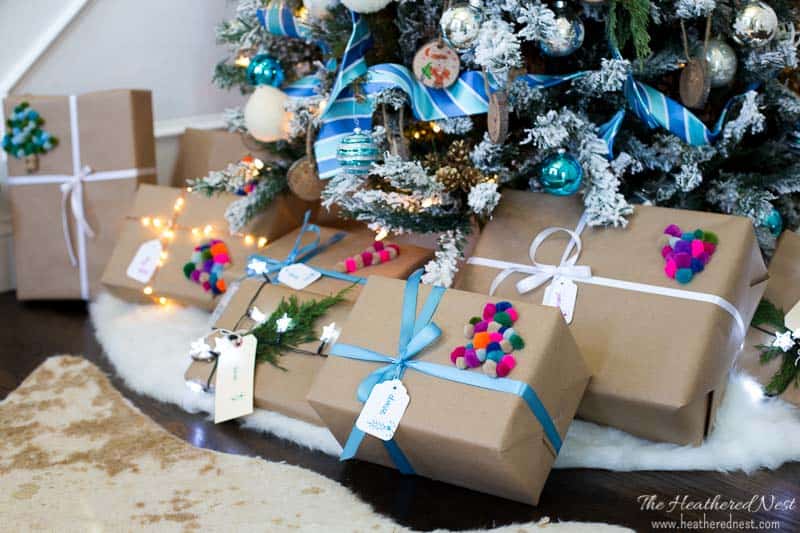
You can try all kinds of fun shapes. We did stockings, a wreath (I added a little ribbon detail at the bottom…seen in the pic below).

A Christmas star, mittens…

Did you notice that DIY lighted Christmas ribbon in the image above? Isn’t it cool?! CLICK HERE for the scoop on that!

I had so much fun trying different cookie cutter shapes to make these adorable pom pom decorations. And it was SUPER easy. Even for a new school wrapper like me.
Give this a try this year! It’s really such a fun and festive Christmas gift wrap idea, no?!
Looking for more gift wrap or fun pom pom ideas, perhaps? We’ve got you covered!
Pin this post for later! And if you make one, leave a comment (or better yet, a photo) on the pin! That helps others know whether they want to try this project, too!

Pssst…before you go, I sure would love to hang out with you again really soon! Sign up now and get a FREE copy of “Builder-Grade To Beautiful: 10 Totally Transformative Home Decorating Solutions, All Under $100!” Click here to enter your email or on the image below. Your copy will be sent right away!


Victoria @DazzleWhileFrazzled says
Oh, so fun! They make you want to rip open the packages!! Visiting from BFF Party.