

How to create a fun DIY felt pig ornament for your Christmas tree…
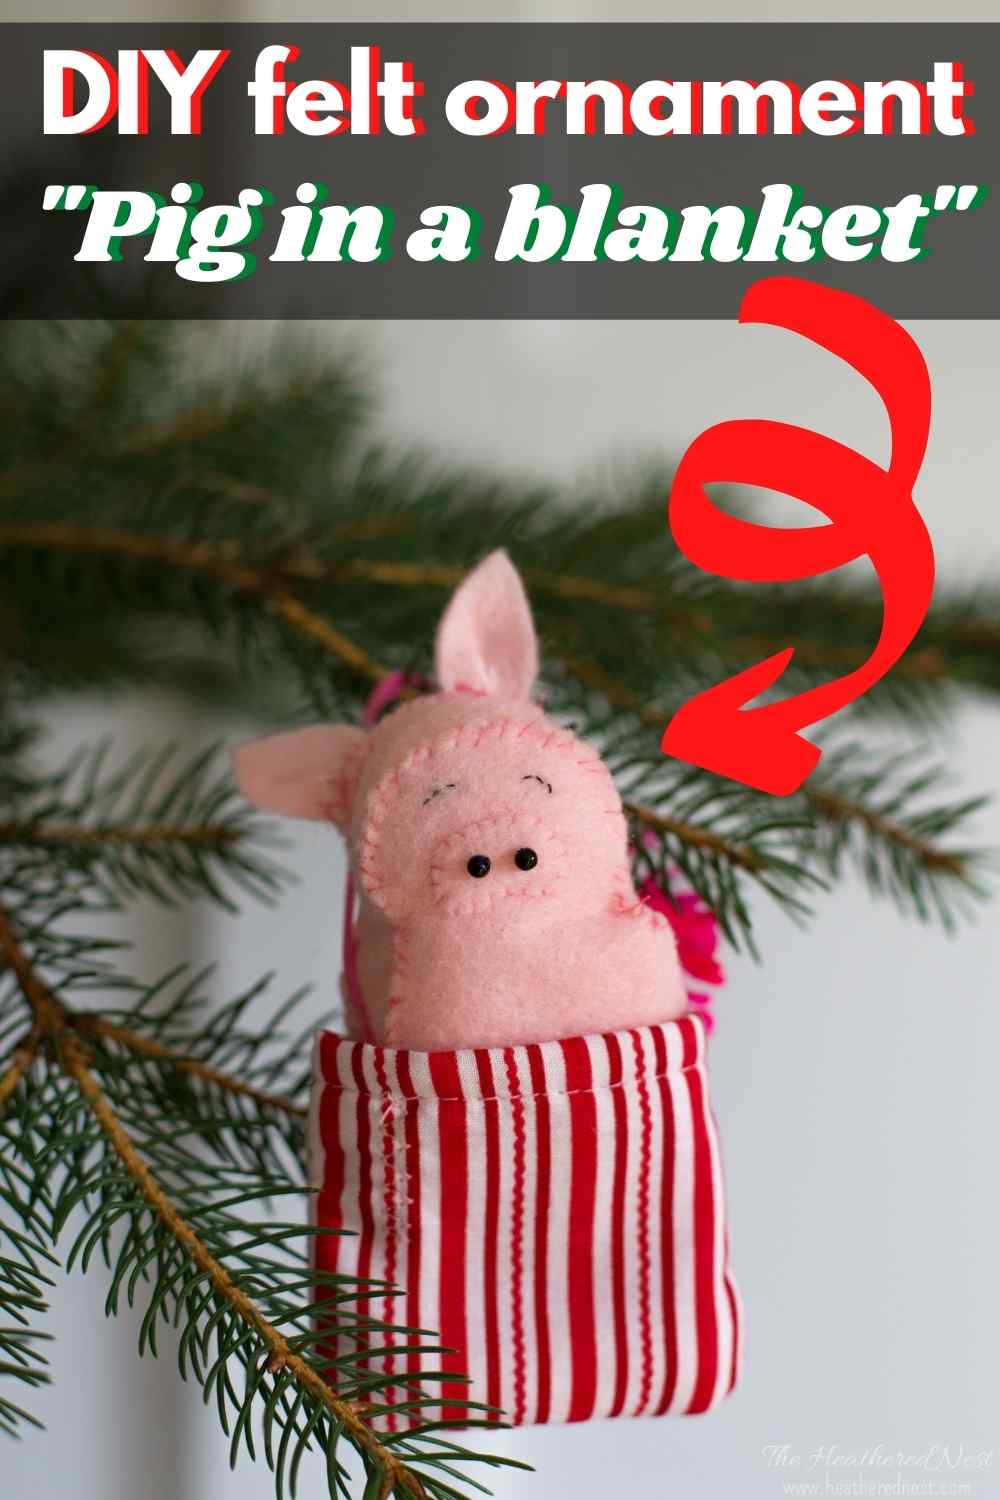
This is the first in a series of felt ornament projects I made this fall. It’s our pig ornament. Or, “pig in a blanket” to be more specific.
One of my kiddos has an affinity for piggies. We have dozens of them, in all shapes, sizes, and degrees of cleanliness.
So when I started seeing adorable felt Christmas ornaments show up in my Pinterest feed, I knew I needed to make a pig for our home.
And what cuter way to have a pig, than a pig in a blanket? Perfect for winter, I think ❄️?!

As far as supplies go, here’s what you’ll need to put these felt ornaments together…

Felt DIY Pig Ornament Supplies
- for PIG:
- pink felt
- pipe cleaner (optional for tail – also pink)
- pink thread
- (2) teensy tiny black beads (with a hole in each…like you’d use for jewelry-making)
- needle for hand-stitching
- scissors
- stuffing
- for BLANKET:
- fabric scraps for the front and back of the blanket
- grosgrain or other section of ribbon (to hang ornament)

This pig ornament is a hybrid of TWO free patterns
How to assemble your pig ornament
1. Cut out all necessary felt pieces.
First cut out all of your felt. This includes everything from both patterns listed above. The pieces will include:
- front of body
- back of body
- side(s) of body
- 2 ears
- 1 tail (if you will be covering a pipe cleaner with felt. alternatively, you can stitch a “naked” pipe cleaner without felt covering to the back of the body)
- 1 nose (either a simple oval or include a small inverted arc section at the bottom as I did)
2. Assemble tail.
If you are going to use a “naked” pipe cleaner, simply wrap about 1″ or a little more section of pipe cleaner around your finger until you’re happy with the way it’s curled.
Then stitch it to the back of your pig’s body.

If you’re going to create a felt “sheath” for your tail (like we did), follow the instructions linked here.
Yours will just be MUCH smaller. All you’re really doing is cutting out a piece of felt that is a hair longer than your pipe cleaner (when it’s extended fully, not curled).
Then you’ll fold your felt over the top of the pipe cleaner, and stitch your felt “taco” closed. Once stitched, you can curl it, and attach to the piece of felt that will be the back of the pig’s body.
I added some pink yarn at the end of the tail, but if I had to do it again, not sure that I’d include that because it isn’t very pig-like!
3. Hot glue or stitch bottom of ears.
As you can see in the linked tutorial, you’ll need to make a small pinch at the bottom of each ear, then stitch (or hot glue) that pinch. That will give the ears some dimension and structure.
4. Stitch ears to the inside of the piece of felt that already has the tail stitched on.
**Stitch the ears in on the OPPOSITE side of the felt that the tail was stitched on to. By doing this, you’ll hide the seam for the base of the ears.
5. Sew beads for nostrils onto felt nose.
Thread the teensy black beads that will be used for nostrils one at a time, and stitch onto the felt nose cut-out.
6. Stitch on nose.
With the nostrils in place, it’s time to stitch the nose onto the piece of felt that will become the front of the pig.
7. Follow instructions to assemble the remainder of the pig’s body.
Now simply follow the instructions in the linked tutorial for assembling the body of your pig ornament. You’ll simply leave off the bunny ears.
8. Assemble your blanket.
Guys, I honestly just “winged” this, but here’s the gist.
8a) Cut out the front and back of your blanket. I put my completed pig on top of a section of scrap fabric I had and did a rough cut out for the front and back of my blanket based on the size of the pig. I tried to create enough “wiggle room” for the pig so that it would be easy to take it in and out of the blanket.
To be more precise, my pig is roughly 3″ tall and 2″ wide. My blanket is about 3″ wide x 3″ tall.
8b) I used my machine, but you could do this by hand as well. Stitch a small seam at the top of both your front and back panels. (This will finish the top edge of the completed blanket).
8c) Attach a loop of ribbon to what will be the inside of your back panel. This ribbon will become the ornament hanger. Mine is approximately 7″ long, but I would make it longer if I did this again. Try using a piece of ribbon about 8-10″ in length. And this will be easier to do, and stronger if you use a wider ribbon. Mine was only 1/8″ and I wish I would have used at least 1/4″ to 1/2″ ribbon.
8d) Stitch the front and back of the panel together. Face the two “good” sides of your fabric together, then stitch the sides and bottom of your blanket together.
8e) Flip blanket right-side-out. You’re done! Hope you love your new little pig ornament!

Don’t miss these other adorable felt Christmas ornament ideas!
Pin this post for later! And if you make one, leave a comment (or better yet, a photo) on the pin! That helps others know whether they want to try this project, too!
Pssst…before you go, I sure would love to hang out with you again really soon! Sign up now and get a no-cost copy of “Builder-Grade To Beautiful: 10 Totally Transformative Home Decorating Solutions, All Under $100!” Click here to enter your email or on the image below. Your copy will be emailed right away!


Leave a Reply