
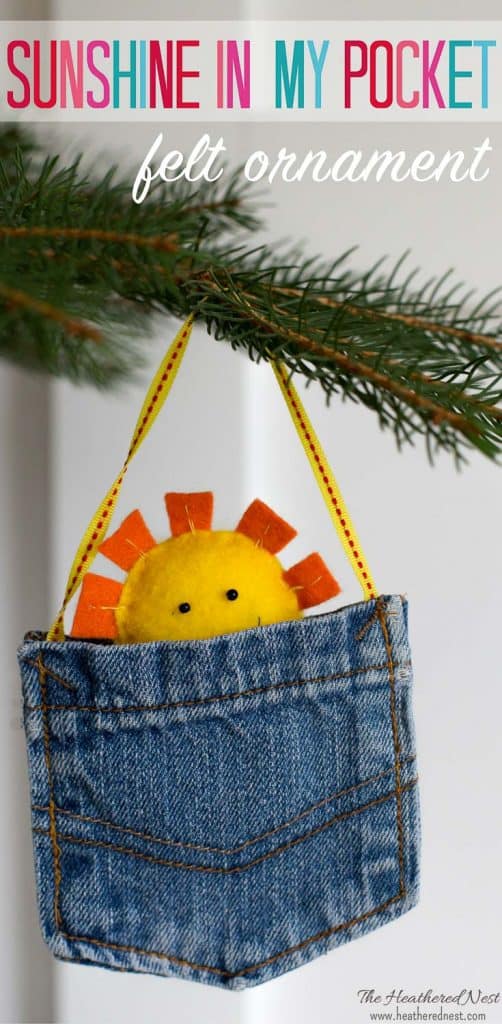
Create a DIY holiday ornament for a little ray of sunshine in your pocket…
We’ve got a serious Justin Timberlake fan in our family.
My 9-year-old is a mini JT super fan. Ok, I *might* be a BIG fan as well. As are 90% of the women I know.
When I was scrolling through Pinterest this fall, I stumbled across this adorable felt sun pattern. And when I saw it, I got this feeling, inside my bones…
Alright, I’m feeling slightly like some creepy, stalker-ish person now, but let’s continue because this ornament turns out TOO CUTE to not share it!

As far as supplies go, here is what you’ll need to create this happy felt ornament…

Supplies needed for Sunshine in my Pocket holiday ornament
- for SUNSHINE:
- orange and yellow felt
- yellow, orange or white and black thread
- (2) teensy tiny black beads (with a hole in each…like you’d use for jewelry-making)
- needle for hand-stitching
- scissors
- stuffing
- for POCKET:
- two denim pockets
- fishing line (to connect sunshine to pocket) optional
- grosgrain ribbon (to make a hanger for ornament)

I used the free pattern and tutorial for the sunshine part of this ornament that I found on the Bugs and Fishes blog HERE. You’ll need to head over there to get your copy pattern and instructions straight away!
SUNSHINE TEMPLATE AND TUTORIAL CAN BE FOUND HERE
How to assemble your sunshine
To make your sunshine, you’ll simply follow the instructions detailed on the blog linked above ☀️. After you’ve completed your sunshine, cut an approximately 8-10″ piece of fishing line, and stitch one end to the back of your sun. This will be used to keep the sunshine connected to the pocket (so it doesn’t get lost).
How to assemble your pocket
This pocket is a great way to upcycle some old jeans. I have a stash that I keep just in case I have creative moments like this 👖.
1. Sew the other end of your fishing line to the inside of one of your pockets. This will connect the sun to the pocket.
2. Cut a piece of ribbon (any kind you’d like) approximately 8-10″ long. Create a hanger for the ornament by stitching each end to the interior of the back pocket, one on each side. When finished, you’ll have a loop that will hang the ornament on your tree.
We’re moving so phenomenally through this craft, right?! (YES, that was another JT reference 😉).
3. Stitch the pockets together. Keeping the right-sides out, simply stitch the sides and bottom of your two pockets together.
Your new holiday ornament is done!

Hope this sweet little holiday ornament project puts some sunshine in your pocket this holiday season! Can’t and don’t wanna stop that feeling, right?
And if you’re looking for more fun holiday crafts and felt ornaments, definitely check these out, too!
Don’t be a stranger, sunshine!!
Pssst…before you go, I sure would love to hang out with you again really soon! Sign up now and get a no-cost copy of “Builder-Grade To Beautiful: 10 Totally Transformative Home Decorating Solutions, All Under $100!” Click here to enter your email or on the image below. Your copy will be emailed right away!


Leave a Reply