

The Best Tips for How To Hang Drywall…
If you’re working on a home renovation project and looking to save a little money with some DIY and sweat equity, then learning how to hang drywall is a great idea!
It’s not very technically challenging. And you don’t need to have a degree in construction to give this project a go. What you need is strong arms (or the right tools), and a few good drywall installation tips.

Here’s what will be discussed in this post:
Luckily, I’ve got time to talk drywall while I’m waiting for paint to dry here in our ongoing basement renovation project.
And I’ll tell you, I’ve gone through 800 paint swatches in the basement, guys. I love picking out paint. It’s literally one of my favorite things to do (If you need advice on the paint front, you’ve come to the right place, because we talk A LOT about paint here)!
That said, picking out paint for a space that has little to no natural light presents unique challenges, that’s for sure.
But the paint is beside the point. Because today, we’re talking about how to hang sheetrock.

Hanging drywall is a great way to save money during a big renovation project.
Basement renovation is a BIG project, and with a BIG project typically come BIG budget-busting, marriage-testing, hormone-challenging, sanity-testing issues.
And that’s a lot of BIG issues to contend with. So here are a couple ideas/posts that may be useful:
- How to safely involve your kids in your next DIY project
- How to DIY together without filing for divorce
OK, now that we’ve covered keeping the family unit intact as we plow through a big renovation, let’s talk hanging drywall.

Hanging versus finishing drywall
It may sound like a scary proposition to you if you have no experience with this task. But, if you are comfortable with a screw gun, you can tackle hanging drywall.
Hanging sheetrock is the first step in the drywalling process.
Hanging the drywall simply means buying it, carting it home, cutting it to fit a section of wall, then screwing it to the framing of the room you’re working on.

Finishing drywall follows hanging, and involves several steps.
Mudding/taping/sanding/finishing the drywall is a separate issue. That’s what is done AFTER the drywall is hung, and before it’s ready for paint.
A discussion of finishing drywall is for another time and post, and quite possibly a task you’ll want a professional to take off your plate. Because if you aren’t skilled at this part of the job, then you could definitely end up with a finished space that you won’t be truly happy with.

The finishing side of drywall jobs takes practice. And in my experience, lots of it. I was taught as a teen how to mud and tape, but even after years of practice, I’m still slow and my finished results are never perfect.

A professional drywall finisher will fly through finishing your drywall with incredible speed. Plus, they’ll do the clean-up.
And sanding drywall is literally one of the ABSOLUTE messiest home projects there is. It ranks right up there with sanding/finishing floors (which is why I didn’t even sand our floors when we painted them).
But just doing the hanging yourself? Especially hanging the sheetrock on the walls? That could save a good amount from your bottom line, and it’s really not an overly challenging task.

Here’s a video from YouTube that highlights the overall process and gives some great tips and advice for the process of hanging drywall.

Hanging drywall video instructions


Supplies for hanging drywall
- 4×8 sheets of 1/2″ lightweight drywall
- 1 5/8″ drywall screws
- Utility knife with lots of replacement blades
- drywall screw gun OR regular screw gun with drywall setter bit
- drywall square
- 2×4 stud(s) to use for nailing strip(s)
- drywall saw (jab saw)
- drywall carry handle
![By Mark Wolfe (This image is from the FEMA Photo Library.) [Public domain], via Wikimedia Commons](https://commons.wikimedia.org/wiki/File%3AFEMA_-_23161_-_Photograph_by_Mark_Wolfe_taken_on_03-29-2006_in_Mississippi.jpg)

How To Hang Drywall – the best tips & tricks
1. Buy sheetrock in the smaller, 4×8 1/2″ lightweight variety.
Do yourself and your back a favor. 4×12 sheets are available, but they are SUPER heavy and are much harder to transport if you don’t happen to drive a semi-trailer.
That said, smaller sheets also means more places to tape, mud and sand. So definitely consider that, especially if you are the one who is going to be doing the finish work.

2. Buy enough drywall screws.
There’s nothing worse than running out of a supply 3/4 of the way through your project. For 16″ on center studs, you will use about 36 screws per 4×8 sheet of drywall, as a rule of thumb.
.png)
3. Consider hanging the sheetrock yourself.
Get an estimate from a drywall company for hanging the drywall and a separate estimate for finishing the drywall.
If you’re up for the challenge, hanging the drywall yourself can save a lot of money, especially in a large space, like our basement.

Hanging sheetrock on vertical walls is simpler than hanging drywall on ceilings. How do you hang sheetrock on ceilings? Well, you either need to rent a neighbor, or a high school buddy who owes you a favor so that you have a few pair of hands, or you can rent a drywall lift which will basically act as your second set of hands. If you’re hanging drywall by yourself on a ceiling, you’ll definitely need a lift.
4. Buy a sheetrock carry handle.
Sheetrock is heavy, bulky, and awkward…even the lightweight variety. These simple, inexpensive tools make the lifting much easier, and a lot more ergonomically appropriate.

5. Hire a professional to do the taping.
I was taught how to do drywall taping by my father. But I still hire someone to tackle larger taping/finishing jobs because a professional can do the work in half the time, and it will look twice as good as it were to tackle the project.

6. Consider doing the sanding yourself.
If you’re really looking for cost savings, this would be another aspect of a drywall job to consider for your DIY list. Sanding isn’t rocket science. You’re just trying to knock down any high points and create a smooth surface for priming and painting.
Use a sanding block in one hand, and your bare palm is the other tool you’ll need. Sand LIGHTLY. The biggest mistake people make is OVER-sanding.
You don’t want to completely eliminate the taping mud. Use your bare palm to feel the surface for smoothness. When you are satisfied that the surface is free of any lumps and bumps, it’s almost ready for paint.

Having said this, if you’re going to pay someone to do the taping/mudding, you may want to just have them go ahead and sand as well.
Not only will the results be better (I mean, no offense to you…but they’re pros, right?) but sanding is M-E-S-S-Y. You will be covered in a fine layer of white dust for days. It’s one of my LEAST favorite DIY projects ever. BUT, when you gotta save money, you do what you have to do!
7. Proper ventilation and gear is a must for sanding.
If sanding yourself, make sure to have proper ventilation or a fan/sanding vacuum system, perhaps a fine dust filter for your wet-dry shop vac (that’s what we use), respirator, and eye protection.
Sanding is the messiest part of a drywall project, and the dust generated is unbelievable. Cover any openings to adjacent rooms/spaces with painter’s plastic. Trust me, you don’t want that dust escaping to the rest of your home.

8. Lightly mark where the studs are on the sheet of drywall
before you hang it. This makes it easier to put the screws in without missing your mark and wasting time and screws
9. The best way to cut drywall is…
by using your drywall square as a straight edge to run your SHARP utility knife against. The knife should score the sheetrock, then you simply snap the drywall along your score.
If it doesn’t give you a clean break, you may want to sand down the jagged edge a bit prior to installing. Remember to change the cutting blade often…the gypsum dulls the blade quickly.
![By U.S. Navy photo by Mass Communication Specialist 3rd Class Patrick W. Mullen III [Public domain], via Wikimedia Commons](https://commons.wikimedia.org/wiki/File%3AUS_Navy_070911-N-8547M-044_Lt._Song_Hwang%2C_chaplain_of_Naval_Mobile_Construction_Battalion_(NMCB)_5%2C_left%2C_and_Builder_Constructionman_Robert_L._Dynda%2C_of_the_battalion%5Ersquo%2Cs_air_detachment%2C_cut_sheetrock_during_a_constructio.jpg)
10. Trim out the electrical outlets and switches after you hang the drywall,
not before…I have made this mistake and it is a pain to remedy. OR, better yet, spring for one of these blind mark electrical box locator tools. They work great and take a lot of guesswork out of this part of the job.
11. Buy a drywall square…
Trust me, a good drywall square tool is worth the $20-ish investment.
12. Consider renting a drywall screw gun.
If you don’t want to buy a dedicated screw gun for drywall, consider renting one. They really make the job much easier.

13. Make sure you have all wiring run before hanging your drywall…
including all the wiring you need for an entertainment system. It can definitely be tempting to “just get the drywall up”, but believe me, take the time and make sure you have the wiring and anything else you want to hide behind the walls, up before you hang the drywall.
I also will install wiring pathways using 2″ PVC piping to allow you to pull wire from one area of the basement to another…or to run that HDMI cable from your TV to your AV components.

14. You always need a solid surface for the edge of your drywall sheet to land on. Plan accordingly.
It’s worth the time to plan ahead and put up 2×4 wood strips where ever the edge of the drywall is going to land.
It really slows you down when you are hanging drywall and you have to stop and go cut a 2×4 and get out the nail gun because the piece of drywall you are about to hand ends and there is no place to screw it into.
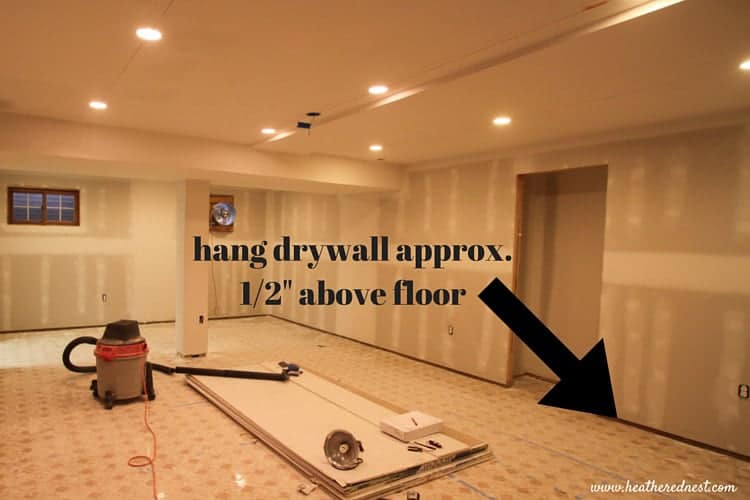
15. Hang the drywall about 1/2″ off the floor.
This helps to prevent the drywall from wicking up any water that might find its way onto the floor.
This was one of the big problems we discovered in our basement during the demolition phase. The drywall had been installed all the way to the floor, and when a water heater had leaked, mold was able to form because of the moisture wicked by the sheetrock. Yuck.
And there we have it. 15 tips to help you tackle hanging drywall, and possibly even finishing your drywall, DIY-style. Hope that saves you some cashola, and maybe even just a teensy-weensy speck of your sanity in your next renovation project.
As for our own sanity here in the nest, well, that’s always been questionable at best. But, I’d say we’re doing ok.
Next week it will be time for the big basement reveal, and as such, we’re starting to enter that uber-fun phase, technically called P-A-N-I-C.

But, we’re getting the stone on our fireplace/entertainment wall. And since we don’t have gas in our home, we bought this super modern electric fireplace, similar to THIS ONE to mount on the wall…

I kind of hear a certain type of 70’s song in my head when we fire this thing up, but whatevs, it cranks out some serious heat, and it makes me smile, and laugh…you can change the color of the flames…WHAAAT?! Hilarious. Never knew I needed this option, but I’m gonna call it a win.
AND, I went for it in the painting department. We had a big, blank wall on one side of the rec room, so I decided I needed a chalkboard wall. A BIG chalkboard wall.

The hubs isn’t so sure, but I have confidence this thing is gonna be awesome. Fingers crossed. Just more fodder for our next marriage counseling session, right?
Any couple who is gonna tackle DIY projects together should line up a counselor ASAP if you haven’t already, you’ll want them on speed dial (count that as tip #16 today).
Thanks for stopping by, friends. I hope this has given you some insight about how to hang drywall in your own home! And if you’ve missed the other posts in this basement renovation series, here are the links plus some other articles that you might enjoy:
- The WORST basement you’ve ever seen
- Top 10 Demolition Tools
- How to Read a Tape Measure: Quick & Easy Use Guide
- A Window Well
- Waste Management Supplies for DIY Renovations
- The Reveal!
- Basement Guest Bedroom Reveal
- Guest Bathroom Reveal
- Painted Stairs
Pin these drywall hanging tips for later! And if you decide to try it, leave a comment on the pin! That helps others know whether they want to try it, too!


Jackie Oliver says
Wow, this seems like a pretty big job! My husband and I are finally ready to finish our basement, and we need to put in dry wall. After looking at this, I am thinking it might be best to hire a professional to come put it in for us, so that it gets done right, and we don’t have to worry about it in the future.
Brooke McAvoy says
I agree that there is a point in a project where you should let a professional finish. It is worth it looking so much better, and you not having to sacrifice so much of your time. I appreciate your information on sanding, this sounds like it would be kind of tricky for me, so I will probably leave that to the professionals as well. Thank you so much for such a helpful article!
Rebecca says
We just ripped out some old wood paneling and now we need to hang dry wall in its place. I’ve been dreading it, so I keep putting it off. Thank you very much for the tips and the reassurance. It’s good to know that it’s a doable project.